Tag Archives: Hydronic heated driveways

Reviewing Electric and Hydronic Radiant Snow Melting Systems – Part I

What are the Best Options for Keeping Your Driveway Clear of Snow and Ice?

Every year it comes, and every year we fight it. I’m talking about snow . . . lots and lots of snow. Sure, it’s pretty and helps to put us in a festive, holiday mood, but the truth is that snow can drain our wallets, sap our strength and even impose on our sleep or leisure time.

Most folks who live in cold climates have become somewhat accustomed to getting up a little earlier or staying up a little later in order to shovel snow from their driveways or clear their roofs and gutters. Usually the shoveling of snow is followed by the disbursement of salt or other snow melting chemicals. Some homeowners – and businesses especially – opt to pay someone else to manually remove the snow. But is manual snow removal really the best way to rid our sidewalks and driveways of snow and ice? There is, in fact, another option – radiant heat.

Radiant heat snow melting systems are fully automated, so once they are installed, there’s no need to worry about snow removal ever again. Electric snow melting systems consist of three components: The heat cable, a snow sensor (activation device), and controller. (Hydronic systems also include a boiler and pump.)
Heated driveway in concrete

The heat cable features a thick wire that is surrounded by layers of insulation, copper grounding braid and a protective outer layer of PVC or polyolefin to form a flexible cable about ⅛ to ¼ inch in diameter. Cable is available on spools as well as in mats. These mats have the heat cable that is pre-spaced and attached to a mesh backing, and can be customized (cut) to suit virtually any type of layout, including driveways, ramps, common walkways and sidewalks, etc.

The activation device for the snow melting system activation device can be either an aerial-mounted or pavement-mounted snow sensor. These sensors activate the system when there is moisture present and the temperature is below approximately 38 degrees. Most systems also include a manual timer to preheat an area before a large storm to curb snow and ice accumulation or to eliminate snow drifts.

When the snow sensor detects the right conditions, it signals the control unit which then sends power through the heat cable. The system warms the surface quickly so that the first snowflakes melt immediately as they land on your heated driveway.

Electric and Hydronic Radiant Snow Melting Systems

What are the Pros and Cons of each Method of Radiant Heating?

First of all, it is important to clarify that one method of radiant heat cannot claim universal superiority over the other. Both types of radiant heat are popular. That being said, each system does possess distinct attributes and advantages.

Electric Radiant Snow Melting Systems

Electric snowmelt systems utilize rugged heat cable that distributes heat evenly across the surface of the driveway or sidewalk. The heating cable is durable enough that it can be installed in new concrete pours, under pavers and even in harsh, high-temperature new asphalt construction projects. It is secured to the remesh and generally spaced at 6 inches while being embedded within about 2 inches of the surface.

The Top Advantages of Electric Radiant Snow Melting Systems

Ease of Installation – Electric radiant heat systems are fairly easy to install. (Handy do-it-yourselfers can do most of the installation. It is important, however, for a qualified electrician to install the wiring.)

Energy Efficient – Electric radiant systems boast a rapid response time, heating the area quickly and efficiently (99% of all energy goes to snow melting, so there is virtually no wasted energy).

Lower Installation Costs – Because electric systems can be installed quickly and easily, the installation costs are minimal.

Maintenance Free – Electric radiant heat systems do not use any moving mechanical parts, so the system is virtually maintenance free.

No Mechanical Room is Required – Electric systems consist of three main components: the heat cable, a snow sensor (activation device), and the controller. So, unlike hydronic systems that utilize a boiler and pump, there is no need for a mechanical room.

SUMMARY: For small to medium sized snow melting applications, electric radiant heat is generally the best choice.

Continued: Read Part II

Reviewing Electric and Hydronic Radiant Snow Melting Systems – Part II

Hydronic Radiant Heat

Continued from Part I

Hydronic heating was the first form of radiant heat, used by ancient Chinese civilizations and further developed by the Romans. Today’s hydronic floor heating systems feature PEX radiant tubing that is usually installed in concrete. For interior applications, the tubing is sometimes installed in a concrete mass called Gypsum Concrete or “Gypcrete,” or, more commonly in the grooves of the advanced aluminum panel system. The pre-cut panel method is known as a low-mass or modular board underlayment system, and is ideal for remodeling as well as most new construction projects.

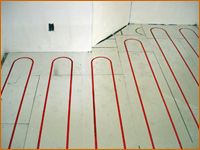
Hydronic floor heating system being installed
Hydronic heated floor with Pex tubing inserted into Rau Panels.

The heating element for a hydronic system involves flexible tubing and specially treated water. Hydronic heated driveways use a closed-loop tubing system to heat the surface of the driveway. The tubing is generally made of a durable polymer (PEX tubing) or synthetic rubber to circulate a mixture of hot water and propylene glycol (antifreeze). The fluid is warmed to temperatures between 140 to 180 degrees F to deliver enough heat throughout the snow melting system.

The PEX tubing can be installed under a variety of mediums, including concrete, asphalt, stone pavers, etc. Successful operation of a hydronic heating system depends on proper tubing spacing and layout. Tubes are usually laid out in a spiral or serpentine pattern for even heat distribution, making initial installation a bit more challenging than that of electric radiant heating systems.

A water heater (boiler) is the heat source for a hydronic heated system, which can be powered by any energy source that satisfies the btu requirements, including natural gas, electricity, oil, wood, or even solar collectors. A circulating pump and supply and return manifolds, installed in an easily accessible location, transfer the liquid between the heat source and tubing.

Flexible Power Source Options (Low Operating Costs) – Because the boiler of a hydronic radiant heat snow melting system can utilize natural gas, oil, wood, or other cheap fuel, the operating cost for large hydronic systems can be lower than that of an equally sized electric radiant heat snow melting system.

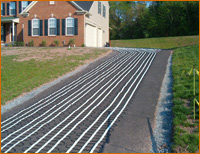
Snow melting mats laid out to heat asphalt driveway
Retrofitting an asphalt driveway with radiant heat. Snow melting cable is placed on the original surface and new asphalt is then applied over the heat cable.

Electric heated driveway systems are generally more efficient than hydronic systems. Electric cables heat up instantaneously, whereas the liquid within hydronic tubing takes a while longer to be heated up before the snow begins to melt. Installation of electric systems is fairly simple for the “do-it-yourselfer”, and heat cable is also available in mats that can be rolled out for simple installation. The mats feature cable that is pre-spaced, attached to a durable fiberglass mesh backing. They can be easily rolled out to heat tire tracks or an entire driveway. This flexibility is invaluable in retrofit applications, where hydronic system installation is more evasive, and costly.

With both radiant snow melting systems, you have great flexibility in terms of the installation configuration (even more so with electric systems). Instead of heating an entire driveway, you may want to install heat cables to only melt snow in the tire tracks of the driveway. The heat cable for radiant snowmelt systems can be customized to heat just about any type of odd shaped area, large or small.

Radiant Heat Offers Flexibility in Terms of Options

If you are considering installing a heated driveway, there are three general driveway heating solutions that are typically recommended:

  1. Install radiant heating cable under the entire driveway pavement.
  2. Install only an 8-10 foot wide strip of heating cable up the middle of your driveway or main traffic area.
  3. Install two 24-inch wide tracks of radiant heat cable up the middle of your driveway.
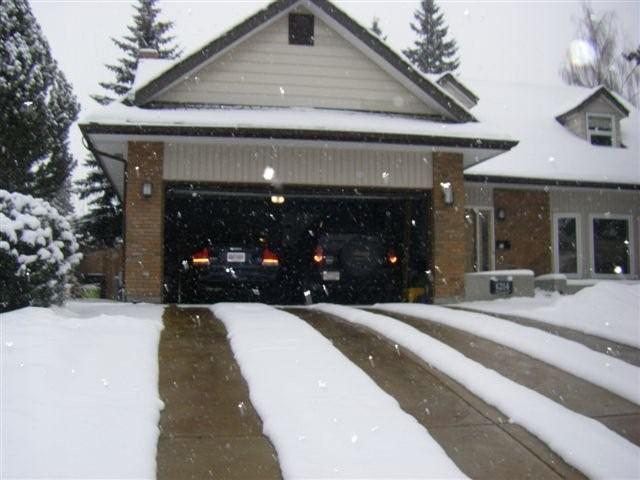
Heated tire tracks in driveway
Electric heated driveway with heated tire tracks in concrete.

Electric radiant heat systems usually cost less to install, and are much easier to install in small spaces. The installation of a hydronic system is much more labor intensive and costs more for materials. However, for larger systems, you will probably save more money on the heating bill compared to electric warm flooring.

Make sure you work with experienced professionals who also provide system engineering and design services, included detailed CAD drawings. Warmzone is one of the best radiant heat providers that you could hope to find. They will work closely with you to ensure that the radiant snow melting system you install is the absolute best system for your specific needs.

Read Part I of this article

Hydronic Heated Driveways vs. Electric Heated Driveways (Part I)

Heated Liquid or Electric Current (Of Water and Wires: Comparing the Systems)

If you’ve finally put down the shovel and decided to purchase a heated driveway system, will you be going hydronic or electric? If you’re newcomer to the concept of driveway heating, hydronic and electric are both popular, and extremely viable forms of driveway heat, and Warmzone has the expertise, and experience, to help determine which is best for you. What these systems share in common—four key components you should be familiar with before purchasing a heated driveway system:

  • Heating Element (Embedded in the driveway)
  • Snow Sensor
  • Power Controller Unit (Powers the heating elements)
  • Power Supply (Circuit breaker panel)

Of the components mentioned above, the heating element and the controller distinguish hydronic heated driveway systems from electric heated driveway systems.

Hydronic Heated Driveway Systems: Going with the Flow

The heating element for a hydronic system, as you may have guessed, involves water. Specifically, hydronic heated driveways use what is known as closed-loop tubing to heat the surface of the driveway. The tubing is generally made of a flexible (and quite durable) polymer or synthetic rubber to circulate a mixture of hot water and propylene glycol (antifreeze). The fluid is warmed to temperatures between 140 to 180 degrees F to deliver enough heat for snow melting.

A water heater or a boiler is the chief source of heat for a hydronic heated system, which can be powered by any energy source that satisfies the btu requirements, including natural gas, electricity, oil, wood, or even solar collectors. A circulating pump and supply and return manifolds, installed in an easily accessible location, transfer the water between the heat source and tubing.

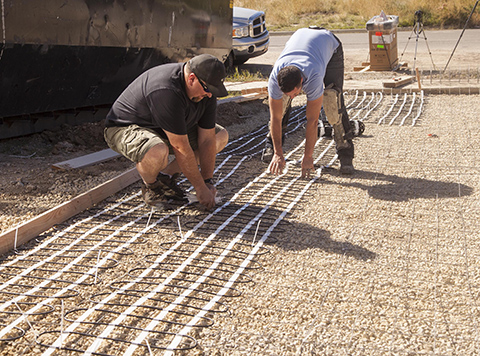
Installing heating mats for electric heated driveway


Electric Heated Driveway Systems: Riding the Current

Unlike hydronic systems, electric heated driveway systems use hot wires to heat paved surfaces. These wires are surrounded by layers of insulation, copper grounding braid and a protective outer layer of PVC or polyolefin to form a flexible cable about ⅛ to ¼ inch in diameter. What’s great about the heat cable is the flexibility of the application. Cable is available on spools as well as pre-woven into mats, and can be customized (cut) to suit virtually any type of layout, including driveways, ramps, common walkways and sidewalks.

After being triggered by the snow sensor, the control unit then powers the heat cable to warm the driveway. To reduce the power demands (and operating costs), you can install cables in just the tire tracks of a driveway rather than the entire area. Warmzone offers several options and provides complete system design services to ensure that you receive the best system layout and products for your project.

Continued (Part II)