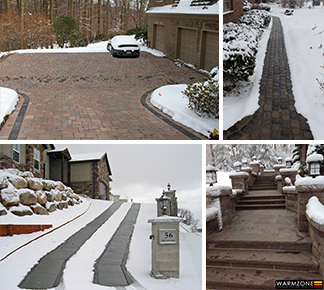
Warmzone Continues to Listen to Contractors and Serve the Needs of Homeowners
Electric snow melting, roof deicing and outdoor pipe heating systems installed in the United States and Canada require ground fault protection for safe operation. In many cases, when installing a snow melting system, these breakers can be expensive and difficult to find. However, thanks to Warmzone, this is no longer an issue.
In addition to offering contactor panels with ground fault protection, Warmzone also offers separate ground fault protection units with snow melting systems and activation devices. These units provide an inexpensive, easy-to-integrate solution to meet the NEC requirements for ground fault protection equipment.
The GF-1 unit provides single circuit protection and the GF-2 provides dual circuit protection (for 120/208/240VAC circuits up to 60A). Unlike highly sensitive GFCI breakers, Warmzone’s GF unit maintains a 30mA fault trip point to reduce nuisance tripping. The unit’s unique design allows installation of standard, off-the-shelf overload breakers into the customer load center. Size the breaker and wiring for the system (15A to 60A), then install the GF unit between the load center branch circuit and the sensor/controller and heat cable. The overload breaker protects the wiring while the GF unit provides the ground fault protection.
The unit is housed in a rugged, NEMA 4X/IP65 rated enclosure, suitable for indoor or outdoor installation. The enclosure features a gasket-sealed front access door for easy testing and reset. All internal electronic components are specified for -40°C to +60°C operation. The enclosure can be easily surface mounted near the load center or near the snow melting system, depending on the installer’s preference. Numerous knockout locations on the enclosure provide flexibility for installation and wiring. The enclosure base can accommodate standard ½ and ¾-inch conduit hubs. Four mounting holes outside the enclosure gasket make mounting a breeze while assuring weather-tight performance.
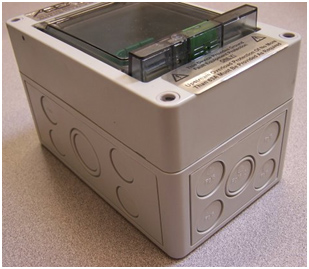
Enclosure for ground fault protection equipment
Features
- Easy installation; convenient access for wiring
- Works together with inexpensive, off-the-shelf overload circuit breakers
- Provides true 30mA trip point GFPE protection
- Meets NEC Article 426.28, 427.22, and CEC 62-300 requirements
- Protects 120/208/240VAC systems up to 60A (#14-#6 CU-only conductor capacity)
- Not Compatible With 277VAC or L-N-L 240VAC
- UL listed (U.S. and Canada) NEMA 4X enclosure for indoor or outdoor installation
- Latching, sealed, hinged front cover for easy testing and reset access
- No overload rating means just two part numbers for simple stocking
- Weatherproof and corrosion resistant enclosure
- Operating temperature range of -40°F/C to +140°F/+60°C
The GF-1 and GF-2 can be used directly with Warmzone’s WS-2C, WS-5C and WS-8C aerial mount snow sensors. They can also be used with contactor panels, switches, and any system up to 60A. Since the overload protection is provided by the load center breaker, only two GF models are required to cover the full range of 15A to 60A, one or two circuits. This allows ground fault protection with kitted systems without the requirement of identifying the customer’s load center type or need to research if a combined overload/GFPE breaker is available and how long it will take to receive.
Including a GF unit completes the snow melting system and makes it ready to install. And the GF unit provides a ready-made solution when installing or retrofitting a snow melting system in an older facility that was wired well before the term “GFPE” was coined. It’s an easy upgrade to help bring an existing system into compliance with modern code requirements.
Including a GF unit completes the snow melting system and makes it ready to install. And the GF unit provides a ready-made solution when installing or retrofitting a snow melting system in an older facility that was wired well before the term “GFPE” was coined. It’s an easy upgrade to help bring an existing system into compliance with modern code requirements.
As your radiant heat partner, Warmzone makes the process of installing a snowmelt system as easy as possible. For more information, call 888.488.9276 today.
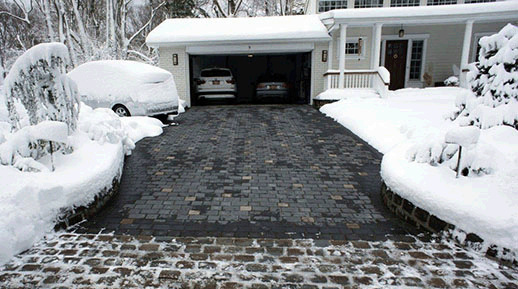
Finding the Right Roof Heating System
Keeping your roof free and clear of ice and snow comes down to proven radiant heating elements, proper system design, and proper installation. A good radiant heat solution is one that addresses all of the potential problem areas of your roof. Warmzone offers a variety of roof heating solutions designed to not only melt snow and ice, but to keep the runoff flowing from your roof before it has a chance to freeze. Warmzone products are specifically designed to target all aspects of a roof, including gutters, downspouts, roof lines, roof eaves and edges—the places icicles, ice dams, and snow build-up are most likely to occur. To keep your roof free of ice and snow, it’s important to target the typical problem spots.
Heating Gutters, Edges and Problem Areas
Warmzone self-regulating heat cable is an extremely effective and energy efficient way to prevent ice dams and keep water flowing through gutters and downspouts. Comprised of a rugged, durable outer construction and an irradiated conductive core that responds to variations in temperature, this durable cable is the affordable choice for heating problem areas of your roof.
Heating Roof Edges
The single greatest snow and ice problem for roofs is due to ice dams. Snow and ice buildup occurs when runoff reaches the colder roof eaves and refreezes. Over time, the buildup increases, resulting in large dams of ice near the roof’s edge, causing water to pool behind it. As that water seeps under the shingles and refreezes, damage can occur, and may eventually lead to costly water damage inside the home.
Low-voltage RoofHeat STEP systems can be installed discreetly under the shingles to keep roof edges completely free of snow and ice. This advanced system utilizes a thin, semi-conductive polymer heating element that can be nailed or stapled through to make installation quick and easy. The self-regulating heating element is polypropylene fused during fabrication to achieve water proofing and protection from alkaline or salt damage.
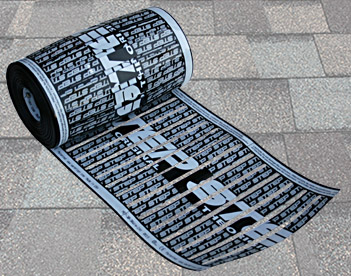
 An 18-inch roof heating panel
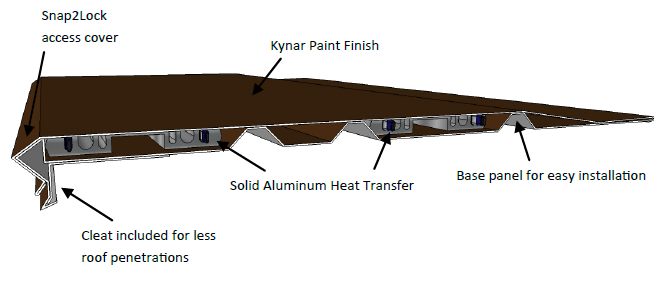
Attractive roof deicing panels can also be installed to eliminate the possibility of ice dams. Available in a variety of sizes, these aluminum panels feature channels of self-regulating heat cable that effectively heats the aluminum to keep roof edges free of snow and ice. The panels have an attractive Kynar finish and can be used in new construction and on existing roofs with most types of roofing materials, including asphalt, wood shake shingles, tile, slate or standing seam metal. Visit our roof deicing panel documents page to learn more.
Heating Roof Valleys
Four and six-inch RoofHeat deicing panels are also available to heat roof valleys. Keeping these channels free of snow and ice facilitates runoff and helps to protect your roof by eliminating potential trouble spots. The Valley Panel system will create an open area (up to 10 inches) for water to safely flow from the roof through the valleys without the possibility of water refreezing over unheated portions of the roof. The Valley Panel roof heating system provides an aesthetic look to any structure while keeping a more efficient and cleaner method of eliminating ice dam issues in a valley or dormer.
Eliminating Icicles
For areas of your roof where gutters are not present heated roof edges can be used to channel water away from the structure. Heated Drip Edge systems are extremely effective in battling icicle build-up while maintaining the aesthetic look of the original roof. This is a common, reliable solution for businesses to ensure the safety and convenience of pedestrian traffic. These Kylar-finished edge lines are offered in a wide variety of materials, including steel, copper, aluminum and more, so they’re great for concealing wiring along the drip line to create a more attractive, polished appearance. An existing metal roof can also be retrofitted with roof heating panels, which can be laid on top of the old metal roof, in direct contact with the self-regulating heat cable to prevent icicle formation.
Still not sure what you need for your roof? Our radiant heat experts work with customers to evaluate project challenges and determine an affordable roof deicing system that is best for your unique circumstances. Warmzone roof heating experts are also available to walk you through the process, from system selection to installation. Call 888.488.9276 for more information today.