Tag Archives: Installation tips

Installing a Heated Driveway

How is a Heated Driveway Installed?

Whether you’re looking to install a radiant snow melting system in concrete, asphalt, or under pavers, it doesn’t take much to make a heated driveway a reality. The important thing to remember is that a radiant snow melting system is only as good as its installation. That’s why Warmzone emphasizes customer support services such as free training and personal installation support. But how is a heated driveway system installed?

Snow melting system overview

Click image to enlarge.

First, a Warmzone radiant heat expert will work with you to determine the specs and products that will best meet the specific needs of your custom project. After verifying receipt of the heat cable and system components, prepare the area where the system is being installed. Make sure there are no nails, sharp rocks or other items present that can cause damage to the heating cable.

Heated driveway installation with Mesh-Up supports

If you are installing a concrete heated driveway, install wire remesh in the area to be heated. Once the remesh is laid out, heat cable is then installed and secured to the remesh using zip ties.  This keeps the cable from shifting during the concrete pour. Mesh-Up plastic supports are then installed to lift the remesh and prevent the heat cable from resting on the ground. (The heat cable should be about two inches from the finished surface.)

With the Mesh-Ups installed and the cable secured to the remesh, concrete can now be poured over the heating cable/mats. Take care to not damage the heating cable. A typical slab is 4-inches thick. Follow your concrete contractor’s installation methods and follow all building codes. The heating cable is to be within 2-inches of the finished surface.

Mesh-Ups under remesh, supporting heat cable

Click image to enlarge.

Most heated driveway systems utilize an aerial mount snow sensor to activate the system. This is typically installed at the roof’s edge where it has open access to the elements. When precipitation is present and the temperature is below the set point (usually set at 39°F), the sensor signals the contactor panel and power is then sent to the heat cable.

View additional “How to” Videos from Warmzone.

Important Note: For warranty and safety purposes, it is necessary for a qualified electrician to connect the system.

General Tips for Using the ETO2 Controller for Snow Melting Systems

Introduction

This article is intended as a  general guide to help users of snowmelt systems that utilize the ETO2 and ground sensor. For more detailed information, please refer to the Owner’s and Installation Manual.

The ETO2 is an electronic controller for fully automatic, economical ice and snow melting for outdoor areas. The controller is used for snow melting and roof deicing systems utilizing in-ground sensors.

The ETOG in-ground sensor detects both temperature and moisture and signals the controller when conditions warrant. The ETO2 unit then sends power to the cable, activating the snowmelt system and warming the driveway surface.

The ETO2 features an easily operated encoder button and backlit graphic display to ensure quick and easy configuration and simple indication of temperature, status, etc.

Controller for an automated snow melting system
The ETO2 controller used for snow melting systems that utilize an in-ground snow sensor.

The control unit is suitable for controlling electric heating cables in a 1 or 2 zone system. It also features advanced two-stage output control for economic operation.

This article only covers some general startup and troubleshooting information for current owners. For installation instructions, please refer to the installation manual provided. (Available on our snowmelt product documentation web page.)

STARTUP

Turn the encoder knob on the front of the ETO2 to scroll through the available options.

Push the Encoder knob to “enter” your selection.

When the ETO2 is switched on for the first time, Celsius” or “Fahrenheit” must be selected. Turn the encoder knob until the required temperature scale is highlighted. Then OK the selection by depressing the encoder knob.

SENSOR 1 is shown on the display, allowing the type of sensor connected for input 1 to be selected. (ETOG ground sensor or ETOR gutter sensor and outdoor sensor.) OK the selection by depressing the encoder knob.

SENSOR 2 is then shown on the display, allowing the type of sensor connected for input 2 to be selected. If no sensor is connected for input 2, OFF must be selected.

OUTDOOR SENSOR: Select if outdoor sensor ETF is connected to terminals 31, 32. If no sensor ETF is connected, OFF must be selected. Press encoder knob for OK.

To select the application type, turn the encoder knob and then depress it.

ELECTRIC 1-ZONE:

ELECTRIC 2-ZONE:

ELECTRIC 2-STEP:

Select the appropriate option and press OK. The system is now set up, and will begin operating fully automatically, in accordance with the pre-configured standard program, see FACTORY SETTINGS. Alternative settings can also be made, see SETTINGS.

Status and afterheat data for zones 1 and 2 are now shown on the display.

OPERATION

The ETO2 is equipped with an easily operated encoder knob/button (turn and press) and a display which describes the current situation. The display is backlit and illuminated by pressing the encoder knob. The illumination is automatically switched off after 30 seconds.

Press the encoder knob and the Main Menu will be displayed. Turn the knob to scroll through the options. Not all the options are shown on the display at once, but they can be accessed by turning the encoder knob. Press OK to select a highlighted option.

SETTINGS

Please note that incorrect sensor setup may lead to poor or lacking ice and snow melting. Press OK and a submenu will be shown on the display. Select the parameter to be set and press OK.

SETUP

FORCE HEAT – OFF Manual start of forced heat. Press OK and select ON to start Forced heat. ETO2 controller will heat in the pre-programmed AFTERRUN time, see AFTERRUN 1 and 2.

SELECT SCALE    C – Whether temperature is to be displayed in Celsius (C) or Fahrenheit (F) can be selected here. Select the required scale and press OK. Press OK to return to the SETUP menu.

RESTART

When changing the settings or require a new process start, the ETO2 can be restarted in this menu.

OFFSET CALIBRATION

Restart operation. Keeping your current settings. The ETO2 will go to the initial status display. If it is necessary to calibrate the temperature measured by the ETOG sensor, please follow the steps below:

  1. Disconnect the sensor from terminals 11 and 12 (sensor heating) of the ETO2.
  2. Wait a few hours until the sensor has acquired the same temperature as the ground.
  3. Measure the real ground/sensor temperature and compare it with the temperature shown on the ETO2 display.
  4. Program the offset for the sensor concerned to match the difference between the two temperatures (displayed/real). Adjust the necessary offset using the encoder button. Press OK.
  5. Reconnect the sensor to terminals 11 and 12 of the ETO2.

NOTE: With ETOG-55 sensor, the temperature shown on the ETO2 display is always the core temperature of the sensor.


TROUBLESHOOTING

By errors in the snow melting system, it is recommendable to check the setup of the ETO2. Activate the menu by pressing the adjustment knob, press SHOW INFO and readout the programmed application. By errors in the setup, activate REINSTALL with factory code 1202.

Check that all connections are placed correctly, and that cables are fastened in the clamps. For more information, contact our technical support department 801.948.7545.

PROBLEM  ACTION / POSSIBLE CAUSE
Display shows HEAT ON in zone 1 / 2 but the snow is not melting: Wait 1-2 hours.

Check under the snow, if the snow is beginning to melt the system is OK.

Check the heating cables for defects or bad connections.

It is too cold for snow melting (power/m2) or undersized heating cables/ hydronic heating system.

Display does not show HEAT ON in zone 1 / 2 The temperature is higher than SET TEMP. Adjust SET TEMP to higher temperature.

The snow around the ground sensor is melting/drifting snow has exposed the sensor.

AFTERRUN time must be increased. Alternatively, FORCED HEAT can be activated.

Igloo effect around the sensor. The ground sensor has melted an insulated hollow under the snow. Activate FORCED HEAT or, alternatively, set MOIST SENSOR to OFF.

The temperature is lower than the OFF TEMP setting.

Depending on dimensioning, the system has a lower temperature limit, at which the system can melt the snow. Try melting the snow with FORCE HEAT, before OFF TEMP is changed.

The heat does not shut off after ice/snow melting: AFTERRUN time is too long – reduce AFTERRUN time and activate RESTART in the menu.

Moisture detection in the ETOG/ETOR sensor is turned off – set MOIST CTRL to ON in the menu.

If the ALARM button flashes red, one of the following errors has occurred. This can be displayed under the menu: ALARM.
RETURN TEMP LOW Water temperature on return pipe is too low.
SUPPLY TEMP HIGH Water temperature on supply pipe is too high.
RETURN SENSOR Return sensor defective.
SUPPLY SENSOR Supply sensor defective.
TEMP SENSOR 1 Temperature sensor in ground or roof sensor 1 defective.
TEMP SENSOR 2 Temperature sensor in ground or roof sensor 1 defective.
OUTDOOR SENSOR Outdoor sensor defective.
SENSOR HEATER Short circuit of heating element in ground or roof sensor.
FROST PROTECT Active frost protection due to low return temperature (water based systems only)

Preparing for Winter’s “Perfect Storm”

Getting the Most out of Your Snowmelt System During Extreme Snow Events

Your Warmzone snow melting system was designed according to ASHRAE standards, meaning it was designed specifically for typical winter conditions in your area – and then some. But every now and then Mother Nature unleashes a furious “perfect storm” of epic proportions that overwhelm even the most hardy winter-weather cities. Snow plows, public transportation and basic city services can be brought to their knees because of unusually low temperatures and record breaking snowfall. Even fully automated radiant snow melting systems are faced with some unique challenges posed by the extreme conditions. Fortunately, Warmzone snowmelt systems include features that allow you to better cope with winter anomalies such as an extreme snow event.

Tips – Preparing for an Extreme Snow Event

If you’re faced with a potential storm of record magnitude, follow the steps outlined below.

Timer: If you purchased a timer with your heated driveway system, use this manual override feature to pre-heat your driveway 2-4 hours before the storm hits. (Once the snow starts to fall, the snow switch will detect precipitation and automatically activate the system.)

Aerial Mount Snow Switch: If you don’t have a timer, you can still manually activate the system using the WS-AUX controller or the aerial-mount snow switch. To activate the system using the snow switch, flip the toggle switch on the side of the unit up so that it is in the ON position. This activates the system and begins pre-heating the driveway. (NOTE: Remember that the system will remain on until you return the toggle switch to AUTOMATIC or STANDBY.)

Control display panel for automated snow melting system

WS-AUX Controller: Activating the system using the WS-AUX controller is the most convenient method for pre-heating your driveway or walks. Turning the sensor override switch on the WS-AUX to the MANUAL ON position will activate the snowmelt system continuously. Pressing the MANUAL ON button on the WS-AUX will not trigger the sensor to run continuously but will initiate one “drying cycle.” This mode can be used to test the system or clear any remaining un-melted snow. This function allows the user to run a cycle without having to remember to turn the system back off. The sensor will initiate one drying cycle and revert to automatic mode, thereby making it ready for detection of the next storm. The MANUAL ON mode can be activated directly from either AUTOMATIC or STANDBY mode. The user may reset and clear the drying cycle by pressing STANDBY.

The WS-AUX will show the current setting of the manual override switch for the attached snow sensor. The sensor’s override switch will always take precedence over the WS-AUX setting. If, for example, the WS-AUX has placed the sensor into STANDBY mode and the sensor switch is moved to MANUAL ON, the WS-AUX will show a change to MANUAL ON mode. Whenever the sensor’s switch overrides the WS-AUX’s setting, then returns to AUTOMATIC mode, the WS-AUX will also revert to AUTOMATIC mode.

In-Ground Snow Switch: For those utilizing the pavement-mount snow switch, refer to page 6 and 9 of the ETO2 User’s Guide Programming Manual.

Working with the Controller

Pre-heat Your Driveways in Preparation for Record Snowfalls

Main menu of the snow melting system controller

In MAIN MENU of the controller, turn the dial to scroll down to SETUP (as seen on page 6 of the User Manual). After selecting SETUP, scroll down to FORCE HEAT and push the dial in to select. This will then activate the system.

Naturally, you do not want to turn the snow melting system on too late or too early, so follow the local weather reports and make your best guess as to when the storm’s first snow will fall. It is recommended to begin pre-heating your driveway (or sidewalks) 2 to 4 hours before any excessively large storm hits. This gives your system a “head start” that will help it to keep up with the unusually heavy snowfall.

Remember, pre-heating the driveway is not necessary in most other cases. Your automated snow melting system was designed to effectively handle typical winter storms in your area. The steps outlined here are simply offered as suggestions to help you cope with the occasional record-breaking snow storm.

Example of dialogue seen on screen of the snowmelt system controller. The heat will stay on the amount of time the designated in the AFTERRUN mode. Once the FORCE HEAT cycle is complete, the device will default back to AUTOMATIC mode. The falling snow will then keep the system on.

Setting the Afterrun time in the controller menu

Adjusting the AFTERRUNTo adjust the AFTERRUN, remain in the SETUP menu.

Refer to page 10 of the User’s Manual.

Set the time for how long before the snowfall that you want to pre-heat the driveway area. Typical time ranges between 2 and 4 hours, depending on the storm.)

Check out Warmzone’s helpful instructional videos on YouTube:
Video instructions on tuning your pavement mount controller

Video instructions for programming your WS-5C aerial-mount snow sensor

Remember, a snow melting system is only as good as it’s installation. So if you’re considering purchasing a radiant heat system, be sure to deal only with experienced professionals who legitimately offer a dedicated support team that will work with you and guide you through the installation process.

And when those record breaking storms come calling at your doorstep, be sure to get the most out of your ClearZone snow melting system by talking to the pros at Warmzone. If you have any questions, feel free to pick up the phone and call Warmzone for additional radiant heat information or to learn how to best deal with extreme snow events. Our business is built on customer service, and we take great pride in being responsive to our customers needs, so don’t hesitate to contact an experienced radiant heat professional at Warmzone today (888.488.9276).

Installing a Radiant Snow Melting System (Part I)

Radiant Heated Driveways can be Installed in a Variety of Applications

Radiant heat snow melting systems can be designed, engineered and installed in any size, shape and type of driveway. From large parking lots to small driveways, steps or sidewalks, radiant snow melting systems can accommodate virtually all your snow melting needs. But the custom options don’t just stop there. You have a variety of options to choose from to fit your budget. You can heat your entire driveway area or just a strip down the middle, or perhaps just two 2-foot wide tire tracks. When you work with a trusted leader like Warmzone, your system will be designed and engineered so that it is the best customized radiant heat solution for your needs.

The ClearZone radiant heat system is one of the most proven snow melting systems on the market, which is why it’s not only a favorite among homeowners, but construction professionals as well. The heat cable can be installed in a variety of applications, including concrete, asphalt, and under pavers.

Concrete Heated Driveways and Sidewalks – New Pour

Heated driveway in Denver

For years the ClearZone snow melting system has proven itself to be one of the most versatile and reliable radiant snow melting systems on the market. It is installed in numerous mediums, but concrete is the most common application for ClearZone heated driveways. The rugged heat cable is designed to withstand the stress of heavy concrete pours. During the installation, the ClearZone cable is laid out and then zip tied to the wire remesh. The concrete is then poured over the cable.

New Asphalt Construction Heated Driveways

Asphalt driveway with heated tire tracks

Hot asphalt can damage some lower quality heat cables, but ClearZone cable is designed to withstand both the extreme temperatures and stress (from the compression) of newly poured asphalt. The radiant heating cable is laid out on the base surface (usually compacted sand), and the asphalt is then hand shoveled on top of the cable and then compacted.

For asphalt applications, it is recommended (but not required) to install 1-inch rigid insulation underneath the base surface. The insulation can be installed underneath the base surface or it can be laid on top of the base surface and the snow melting cable can then be secured on top of the insulation.

Brick Paver Driveways – Installation

Large heated paver driveway

ClearZone radiant snow melting systems are the most effective systems for heating under pavers. Installing a radiant snow melting system under brick pavers is also one of the easiest radiant heat installation methods. The heating cable is laid out on the base surface and the pavers are installed as normal, directly over the cables. Because the ClearZone cable has been tested and approved for wet conditions, the cable can come in contact with moisture without its performance being affected.

Continued – Go to Installing a Radiant Snow Melting System (Part II).

Installing a Radiant Snow Melting System (Part II)

Repaving and Retrofitting Asphalt Driveway with Radiant Heat

Continued from Installing a Radiant Snow Melting System (Part I).

The ClearZone snow melting system is unique because it isn’t limited to new construction applications and can withstand the rigors of concrete pours and hot asphalt. If you have an existing asphalt driveway and intend to re-pave it, you can retrofit your driveway with a ClearZone snow melting system. The heat cable is secured to the existing asphalt with clips and nails and only needs to be embedded under just ½-inch of asphalt. The new asphalt is hand shoveled onto the cable and then compacted. ClearZone cable is simple to install and provides the best performance for heating asphalt driveways.

Fully Automated

The heat cable is wired to the master controller, which is usually mounted on a wall in the garage. An aerial or pavement mounted snow sensor is wired to the controller. When the sensor detects precipitation and the temperature is below a set point (usually 39°F.), it signals the controller, which then sends power to the heat cable to warm the driveway. While the system is fully automated, the controller also features manual override capability for times when you may need to melt a snow drift or ice that formed in a shady spot.

Heated concrete driveway for mountain lodge

In addition to the many different types of surfaces that the ClearZone snow melting system can be installed under, you have many custom configurations that you can choose from. Warmzone will work closely with you to keep within your budget while providing the optimum snow melting system for your needs. As a leading provider of radiant heat solutions, Warmzone will provide a detailed design of your snow melting system so that you know all the electrical and layout requirements prior to any installation. Warmzone also provides you with technical support during the installation.

Once installed, radiant snowmelt systems are virtually maintenance free, and in addition to helping preserve the quality of your concrete/asphalt driveway or sidewalks, it also eliminates the damage caused to surrounding grass and vegetation from salt and corrosive snow melting chemicals. With your radiant heat snow melting system, there’s no need to apply salt or harsh snow melting chemicals to your driveway. So enjoy those snowy mornings from the warmth of your living room and admire your clear driveway as you sip your hot coffee. The days of shoveling and salting are over.

When it comes to installing a snow melting system, it pays to work with the best. In addition to Warmzone’s competitive pricing, you’ll receive top-notch customer service. Call and talk to a radiant heat expert today (888.488.9276) to learn more about heated driveways and snow melting systems. You can also send Warmzone your project information and receive a free radiant heat quote. There’s no obligation.

Go back to Installing a Radiant Snow Melting System (Part I).

Tips for Successful Radiant Heat Installations

Installing a Radiant Snow Melting System

A radiant heated driveway is only as good as its installation, which is why it’s important to carefully follow best practices. As long as you remember a few simple tips, your snow melting system will be up and running in no time, and in good working order for years to come.

Installing heating cable in mats for heated driveway and sidewalk

This may seem like a no brainer, but it’s important to make sure you have the right products for your installation before you lay one foot of cable. Before every job, remember to check the voltage and the wattage of the heating cable (usually indicated on the box). If you’re unsure, you can always contact Warmzone for confirmation and/or recommendations.

A key to successful installations is to use a megohmmeter to perform OHM tests of the heat cable before removal from the box, during, and after the installation. This can save you some headaches in the long run and help to ensure a successful install. Be sure to document the results in order to establish the manufacturer’s warranty.

You have everything you need to construct the driveway of your dreams. Before you roll out any cable, here are a few rules to remember at installation time to prevent cable damage and get the most out of your system:

  • Never cut, cross or overlap the heating cable. Heat cable should not be altered under any circumstances, as it may cause overheating, resulting in damage to the cable.
  • Always embed the cable completely. Leave no air around the cable.
  • Make sure to embed the factory splice (where the heating cable and power lead meet).
  • Using a megohmmeter, perform OHM tests of the heat cable before removing the cable from the box, during the installation, and after the cable has been laid out.
  • Always run the cold lead in conduit (power lead for the heating cable) – it is not direct burial.

For asphalt applications, snow melting cables are normally covered by two inches of asphalt. To prevent heat damage, the asphalt should be allowed to cool to 220°F. (105°C.) before pouring directly onto the mats or cables. Ground sensors/tubes should not be exposed to temperatures above 176°F. (80°C.).

And, for a proper sensor installation, both ground and aerial activation devices require a clear, 360-degree “view” of the sky to allow snow to fall onto the sensor plate. If drifting is an issue where the snowmelt system is being installed, it’s best to install a ground sensor.

For more installation tips, read our helpful Installation Overview web pages:
Installing Snow Melting Systems
How to Install a Heated Driveway (in Concrete)

Of course, you should always read the Installation Manual and follow instructions. Or you can always call Warmzone at 888.488.9276 for on-the-job installation support and service.

Installing Radiant Heat in Asphalt

Asphalt Heated Driveways
When you combine the durability of asphalt with the automated snow removal capabilities of a radiant heated driveway, you get a winner. Asphalt heated driveways feature energy efficient, maintenance-free operation to keep your driveway safe and clear of snow and ice. If you’re considering a new asphalt driveway, a refresh, or even if you’re already enjoying the benefits of asphalt, there’s still time to include a radiant heated driveway in your plans.

Radiant heated driveway in Denver, Colorado. Asphalt and heated driveway systems go together for several reasons. First, they are durable, and engineered to withstand extreme heat, freezing and thawing. They also adapt easily to the environment. Asphalt pavements flex and “give” with significant settlements of frost heave, while Warmzone snow melting systems respond to the weather, operating only when conditions indicate that snow is on the way.

Applying hot asphalt over heat cable mats

ClearZone heat cable is specifically designed to withstand the hot temperatures of new asphalt construction jobs. In the case of a new driveway install, the asphalt is spread directly over the rugged ClearZone heat cable and then compacted. In one day, you can have a new driveway and a fully operational snow melting system. The embedded, fully automated, radiant heat snow melting system provides a discreet, reliable snowmelt solution for your driveway.

If you’ve already got an asphalt driveway, but it’s in sore need of repair, placing an overlay on the existing surface can be easily accomplished. As with the new pour, ClearZone snow melting cable can be installed just before the overlay. After a quick patch, a surface of about 2 inches is all you’ll really need for your driveway, and your new snow melting system installation.

If you’re not in the market for an asphalt refresh, no worries. Your existing driveway can be retrofitted with radiant heat. Grooves are cut in the existing asphalt, using asphalt saw-cut technology, and the heat cable is then placed in the freshly cut grooves. An epoxy topcoat is then applied as a sealant over the newly embedded cable. For additional traction and safety, a sand broadcast can be applied to the surface before the epoxy.

Fitted with a ClearZone snow melting system, an asphalt driveway is a cost-effective option for your home, and will last for years with only minimal maintenance. With radiant heat in the mix, you can also factor in all of the money you’ll save on snow removal services, snow melting chemicals and gas for your snow blower. And of course, there’s the gift of time. While your neighbors are out shoveling, snow blowing or tapping their watches waiting on their snow removal service, you’ll be in your car and on your way.

Need to do some more homework on this one? Learn more about the many options available by reviewing our website or call Warmzone today, at 888.488.9276. Receive a free quote for your radiant heating project.

Warmzone Services for Professional Installers

Approach your Radiant Heat Project with Confidence

Good help is truly hard to find for most of us. Using the phone book to find a radiant heat installer seems like a game of contractor roulette. Just how do you know that what you’re paying for is truly what you’re getting, or that the provider you choose will be reliable enough to complete the job once it’s started?

Radiant heated driveway

When you’re ready to do a radiant heat installation, remember that any system is only as good as the installation. It pays to shop a radiant heat provider who offers a one-stop shopping experience, plus the top-notch solutions and radiant heat installation support services to back them up. Many radiant heat providers may claim to offer installation support, when in fact, they have no dedicated support staff to follow through with their claims. These businesses will say all the right things to get you to buy, but after the purchase, the nightmare often begins. Experiences like this are eliminated by working with a company like Warmzone.

Dedicated Staff of Installation Support Experts

Unlike most other providers, Warmzone has expert electricians, designers, and engineers who are on hand specifically to work with you during the installation process. Furthermore, Warmzone maintains relationships with a large network of experienced installers who can be recommended to help make your radiant heat installation a smooth transaction from start to finish. In other words, Warmzone is committed to its customers and installers throughout the entire purchase, design, and installation process. You simply won’t find a more dedicated, accommodating and professional staff to work with.

If you are looking to install heated floors, a heated driveway or a roof de-icing system, Warmzone offers one of the largest selections of top industry products to best meet your specific heating (and budget) needs. To further bolster peace of mind, Warmzone can refer to its network of experienced radiant heat installation professionals and recommend an installer you can trust. But Warmzone doesn’t leave at this point. Their seasoned electricians and designers will continue to be available to your installer to assist whenever needed. Warmzone stays with you to ensure that the installation process goes smoothly and that your system is performing as advertised.

Paver heated sidewalk

While the correct installation of your radiant heat system is first and foremost, the other key factor lies in the quality of the products and design of the system. Warmzone constantly researches and tests the latest products to ensure that their vast selection includes only the industry’s most proven, reliable products. Heating elements include low and line-voltage heat cable, flexible polymer elements, durable self-regulating heat cable, thin FilmHeat, and even hydronic radiant heating products.

Warmzone systems have been installed in large commercial and custom residential projects throughout Northern America for over a decade – and in virtually every conceivable radiant heat application. Dealing with a large and highly reputable radiant heat provider like Warmzone has its perks. With so many products to choose from, you not only are assured of the right fit for your project, but you’re likely to be able to get a custom radiant heat solution at a considerable savings.

  • Installing heated floors? In addition to its wide selection of floor heating products, Warmzone carries two of the industry’s most trusted and popular floor heating systems. The ComfortTile heat cable (and mats) and FloorHeat low-voltage floor heating systems have been installed under virtually all types of flooring material.
  • Installing roof de-icing? You’ll find plenty of custom solutions available for both new construction and remodeling projects. Warmzone’s roof heating systems are among the best when it comes to ease of installation, performance, and efficiency. Eliminate ice dams and protect your roof by melting snow and ice in roof valleys, roof edges, gutters, and more.
  • Installing a heated driveway? Warmzone offers snow melting solutions for all types of snow melting projects and applications, from small residential driveways to large commercial parking structures and ramps, city sidewalks, loading docks, driveways, steps, etc.

Besides high quality products at competitive prices, Warmzone provides unmatched customer service and complete design and engineering services along with free installation training and expert installation support. Upon request, your radiant heat solution will come with a detailed, professional system design. Basically, you’ll know all the specs and power needs as well as performance expectations prior to any installation. You can also access a complete online library of installation support information including manuals, product guides, illustrations, installation videos, and more for your projects. It’s free and available whenever you need it.

Your Network of Experienced Radiant Heat Installers

Finding the right contractor to install your radiant heat system can be a risky proposition. Many contractors are just getting up to speed on radiant heat. Take heart. If you’re looking for help with your radiant heat installation, you don’t have to go it alone. Warmzone has a robust network of experienced installers who have established a reputation of trust. Warmzone maintains relationship with these installers and have worked with them in the past, so the trepidation of finding a qualified installer you can trust is virtually eliminated. Warmzone can find the ideal installer for you, whether you’re installing heated floors, roof de-icing or a heated driveway system. Installers in Warmzone’s network are familiar with installing Warmzone products and have proven themselves with prior installation projects.

Sure, like any home improvement project, radiant heat installation has its challenges. But with a wide product selection, professional system design services, and a large network of experienced installers and a dedicated installation support staff, Warmzone makes it easy for homeowners and contractors alike! Visit www.warmzone.com or call 888.488.9276, and install your radiant heat system with confidence.

Don’t Get Spooked by Winter Weather

Meet Winter Head on with a Radiant Snow Melting System

You’ve no doubt heard about El Niño this year and the predictions of all the so called “weather experts”. Well, the truth is, we can never fully know what Mother Nature will bring us each year. Sure, we make the most educated guess possible, but it’s still just that – a guess.

So don’t let the doomsday sayers intimidate you into believing you’ll be lucky to escape winter alive this year. Halloween may be coming, but there’s no reason to be spooked by winter too. Certainly, it’s good to be prepared and keep some important items on hand for those times when you can’t make it to the store for a day or two, but chances are that winter will come and go, and spring will greet you with a smile – just like it did last year, and the year before.

But how you choose to deal with winter is up to you. For homeowners with steep driveways or business owners with outdoor steps, ramps and busy customer access points, installing a heated driveway or snow melting system is a pretty obvious solution. Radiant snow melting systems are fully automated and operate only when needed. That means that regardless what day or time the snow falls, the systems will respond to keep your driveway or walks clear of ice and snow during all of winter’s cold assaults.

Using salt to melt snow damages lawns and nearby shrubs.

Many consumers have opted to forego stocking up on salt and other snow melting chemicals prior to winter. Some have even been swayed not only by the convenience and effectiveness of radiant heat, but because of the added benefit to the environment. Salt and snow melting chemicals, while somewhat convenient in melting snow, are not so friendly on the surrounding landscape. The adverse environmental effects of salt and snowmelt chemicals leave scars year round. When spring arrives, the bordering grass and shrubs often reveal the ugly scars from the repeated use of snow melting chemicals during the winter.

But the greatest advantages of radiant snow melting systems are their convenience, clean, silent operation and round-the-clock reliability. And electric snow melting systems are maintenance free, saving your back from shoveling and your head from aching.

Heated driveway with brick pavers

Warmzone radiant snow melting systems are easy to customize and install. In addition to offering the industry’s most reputable heat cable and system components, Warmzone also includes professional system design and installation support services. When you work with Warmzone, you are partnering with experienced professionals who see your project through – from start to end. After all, radiant heat is a considerable investment in your home, so it makes sense to deal with the best, most trusted experts in the field.

Contact a radiant heat professional at Warmzone today (888.488.9276). Warmzone also offers free installation training. For more information about our training courses, call us at 801.948.7545.

Avoid These Common Installation Mistakes!

Important Do’s and Dont’s when Installing Radiant Heat

Record Resistance Values in Warranty Card – First and foremost, keep your warranty valid by following the installation instructions and using a megohmmeter to measure the cable readings before, during and after the installation process as outlined. (The megohmmeter is a special type of ohmmeter used to measure the electrical resistance of insulators.) Measuring the cable’s ohm reading during the installation process provides the required warranty information and can reveal if any cable has been damaged during the install.

 ► Upon receiving the heat cable, check the ohm value shown on the cable tag. Write this figure in the space provided on the warranty card.
 ► Measure the ohm reading of the cable and record the results in the space provided on the warranty card.
 ► Lay the cable out and secure it so that it is ready to be embedded (under concrete, asphalt or pavers). Measure the cable’s ohm reading prior to being embedded. Record this value in the space provided on the warranty card.
 ► Apply the top layer and measure the ohm reading. Record the results in the space provided on the warranty card.
Cable Installation Tips
 ► Always maintain proper cable spacing. (Cables should be spaced no less than 2 inches apart (center-to-center) and no more than 4 inches, center to center. Minimum spacing is 2 inches. Maximum cable spacing is 4 inches.)
 ► Never allow the cables to cross or touch each other.
 ► Never cut the heating cable.
 ► In concrete and asphalt applications, the installed heating cable should be 2 inches from the finished surface. (The heating cable should never be resting on the ground prior to the pour.)
 ► Never run heating cable through an expansion joint. (Make sure the joint is tooled or cut NO deeper than 1¼-inches. The cable must be ¾ to 1-inch below the bottom of the joint.)
 ► Do not flex or strain the cable splice by pulling on the cable. All of the cable must be embedded, including the entire splice and 6-inches of cold lead.
 ► Avoid kinking or bending the cable sharply (which causes the insulation to “bubble” and pull away from the cable).
 ► When installing heat cable in paver applications, make certain that there is ½-inch of compacted paver sand or stone dust on top of the heating cables or mats. (Cables must be completely encased with no air gaps.)

Radiant heat warranty card
      Warranty card for snow melting system.

Do not hesitate to take advantage of Warmzone’s personal installation support services. We have dedicated experts on hand to assist installers, so if you have any questions during the installation process, our electricians and designers are happy to assist you. Warmzone also offers free installation training, both in-house as well as training via web seminar. It is our goal to ensure that our customers are happy and that each system is installed correctly and performing as intended.

Calculating the Operating Costs

Estimating the Cost of a Radiant Heat System

One of the most common questions among prospective buyers of radiant heat systems is: “How much will it cost to run the system?” While there are many factors that contribute to the answer of this question, we still can offer a formula that will help you determine what you can expect in terms of operating costs.

Keep in mind that the operating cost of a snow melting system will depend on the specifics of the system. Warmzone custom designs each snow melting system to ensure peak performance and energy efficiency. Radiant snow melting systems are designed specifically for the winter conditions in your area. Everything from altitude and average snowfall is considered as well as average winter temperatures. Before using the formula shown here to calculate the operating cost of your snow melting system, you’ll first need to know the kilowatt per hour rates of your local power utility company. These rates vary from region to region, so we used the average kilowatt per hour rate for the formula attached.

Operating cost calculation for radiant heat system in asphalt

Warmzone’s experienced design team configures your snow melting system to best meet your snowmelt needs in the most efficient manner possible. The ClearZone snow melting heat cable is a proven industry leader that is available on spools or pre-spaced in mats for simple “roll-out” installation.

While systems vary, residential snow melting systems typically operate at 37 watts per square foot while commercial snow melting systems operate at 50 watts per square foot. The formula shown here would therefore change accordingly and you would multiply the square footage by 50.

Estimating the Cost for Operating an Electric Snow Melting System

 ❶ Determine the total square footage of the area that will be affected.
 ❷ Multiply the square footage by the heat required (e.g., 37 watts per square foot for residential). This will give you a total for the watts per square footage required.
 ❸ Divide this number by 1,000 to convert to kilowatts.
 ❹ Look up the kilowatts-per-hour rate from the local power utility company.
 ❺ Multiply the total watts-per-square-foot by the watts-per-hour.
 ❻ This gives you the cost per hour of usage for the snow melting system.

To find out more about Warmzone’s industry-leading snow melting systems, call 888.488.9276 and speak to a Warmzone professional today.

Warmzone to Release Instructional Videos

On Tap – Online Resource for Instructional Radiant Heat Videos

If a picture is worth a thousand words – as the saying goes – how much is a video worth?

“Invaluable”, said Troy Lindsay, general contractor and owner of PAE construction in Denver, Colorado.

While installing a radiant heat system is a not an extremely difficult task, it is still crucial to follow the correct procedures to ensure the system performs as intended. Considering the importance of proper installation, Warmzone extends the industry’s most extensive customer services. These customer offerings include personal installation support, detailed system design / layout services, and free installation training courses. These valuable services give professional builders distinct advantages when it comes to purchasing and installing radiant heat. The addition of an extensive online resource of instructional videos will further benefit contractors and simplify the installation process.

A veteran installer of commercial and residential radiant heat projects, Lindsay understands the value of instructional videos. “Having access to training videos will be an asset to installers everywhere,” he added. “It’s great being able to talk with electricians and designers at Warmzone during the installation process, but sometimes it really helps to be able to SEE what is being explained. Videos help to make things clear and can help keep Warmzone and installers on the same page and on track during the installation. Ultimately, the videos can save us time and money in the long run, and every contractor likes the sound of that!” he concluded.

How to videos for installing radiant heat from Warmzone

Warmzone senior training and support specialist, Jim Sage, reiterates the value of the soon-to-be-released video library.

“Many installers take advantage of our free installation training program, and after they complete our course and receive a certificate of completion, we can refer additional business to them. But sometimes we work with construction personnel who have not completed one of our training sessions. It’s one thing to explain a process over the phone, but going over the procedure and then having them view it online clarifies things and gives installers the knowhow to proceed with confidence. And the videos are not only advantageous to us and installers, they can also protect homeowners by providing clear methods and procedures that can help ensure the proper installation of their radiant heat systems.”

Watch for Warmzone’s new online video library launch, and take advantage of the information provided by Warmzone. In addition to our superior customer services, Warmzone radiant heat systems are at the top of their class and can be customized to accommodate virtually any type of radiant heat application. For more information on installing an interior or exterior radiant heating system before next winter, call a Warmzone pro at 888.488.9276.

Proper Installation Techniques

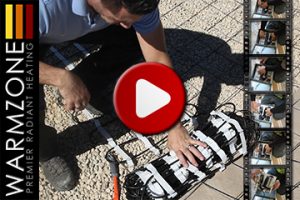
Installation Tips for Installing an Electric Snow Melting System

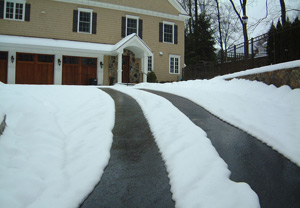
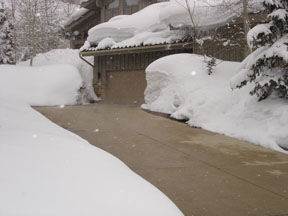
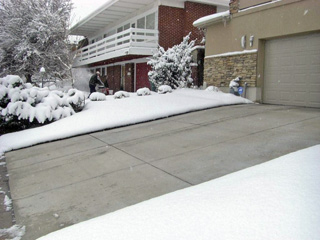
Winter is supposed to be colder and snowier than ever this year. If you’re living in the snow belt, you can meet the snowy weather with a solution that’s sure to make your winter much more bearable. From installing radiant heated floors to heated driveways and roofs, Warmzone makes the process of tackling a radiant heating project much easier.

Heated driveway with four heated tire tracks

Before installing any heat cable, it’s important to know the ins and outs of radiant heat installation to maximize the performance of your system and ensure that the warranty remains valid. In addition to Warmzone’s free consultation and installation support, a wealth of information is also available online in Warmzone’s radiant resource center, where you can find articles, installation manuals and related information.

Basic Tips for Installing Snow Melting System
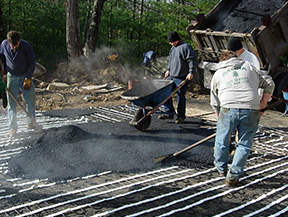
Cable Care – Extreme care must be used to ensure the cables/mats are not damaged when using sharp tools, wheelbarrows, shovels, rakes or heavy machinery.

Check Supply Voltage – Make sure that the supply voltage matches the voltage required for your specific snowmelt product.

Measure Cable Resistance – Remember to always measure, verify and record the actual resistance of the heating element throughout the installation process:
1.  Out of the box
2.  After laying the cable out
3.  After applying the surface material

Never cut the Heat CableHeat cable is resistance cable. When it is shortened it increases the wattage per foot of the cable. Altering the cable in this way can void the warranty and cause the heat cable to fail due to over-temperature.

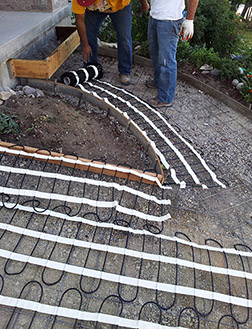
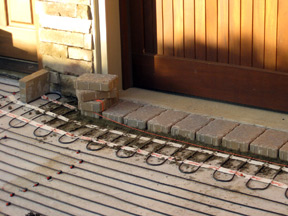
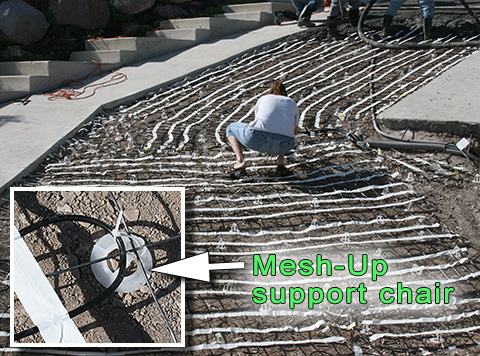
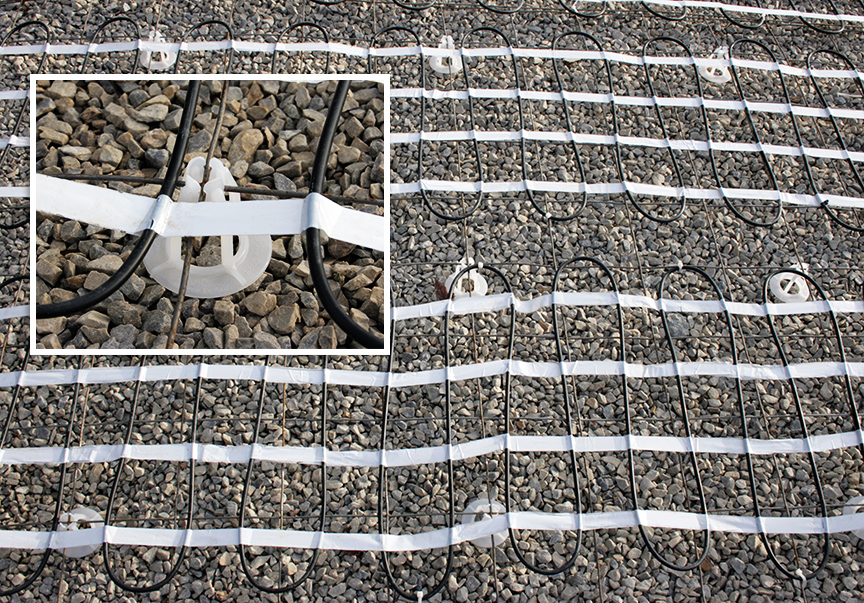
Laying out Heating Mats – Unroll the heating mat on to the area you want to heat. Fasten the heating mat to the mesh reinforcement using tie-wraps, zip ties or cable strapping. Do not cause the heating cable of the mat to be compressed or strained.

Do not let Cables Touch – Never allow the heating elements to cross, overlap or touch.

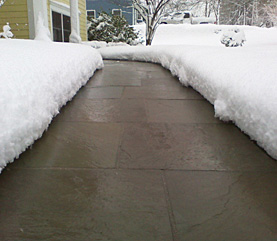
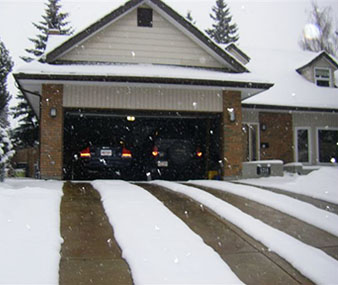
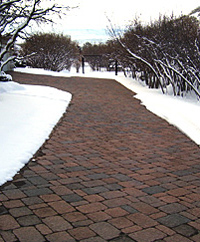
Embed the Cable – Whether you’re installing in concrete, asphalt or pavers, make sure that the cable is completely embedded under the surface. If uncovered, it can malfunction in the area of exposure.

Embed the Power Lead – The power lead/heating cable splice and at least 6 inches of the power lead must also be embedded in the paved surface. The remaining power lead should be run through a conduit.

Making Turns with MatsHeating mats can be altered to accommodate drains, obstructions or bends in the layout. To make turns or alter the spacing of the heating cables in mats, only cut the tape – NOT the heating cable.

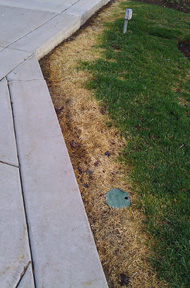
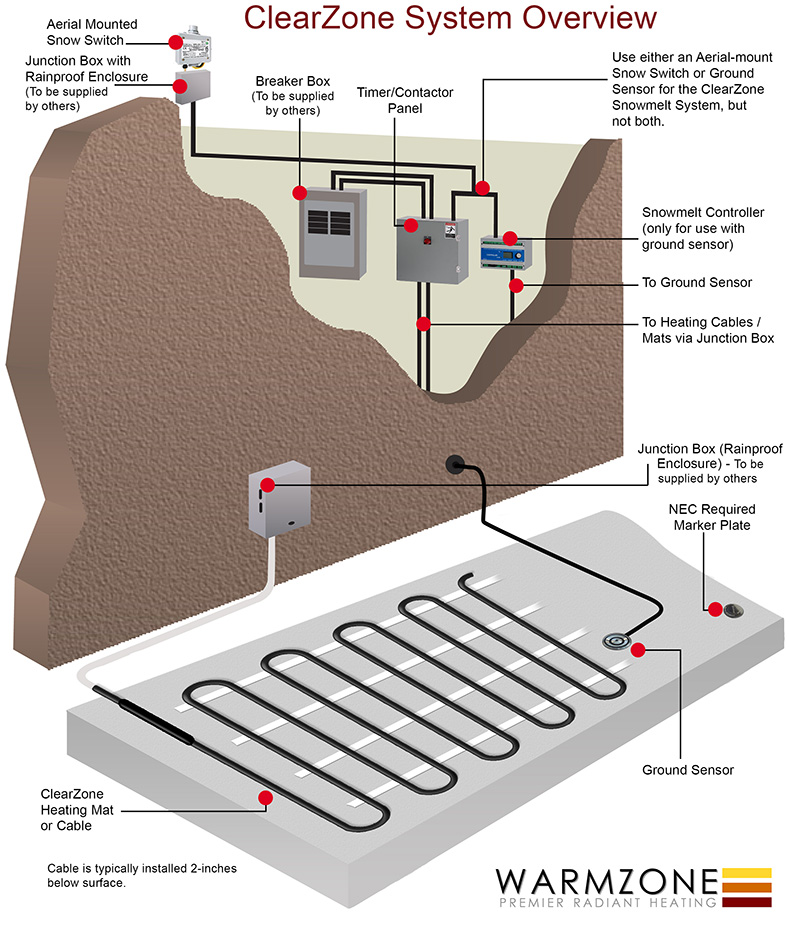
Ground Sensor Placement – The ground sensor must be placed between the heating cables within the heated area at least 3.3 feet (1 m) from the edge of the area. A minimum distance of 0.41 inches (1 cm) should be maintained between the sensor tube and the heating cable.

Aerial Snow Sensor PlacementAerial sensors should not be placed under eaves but where there is direct exposure to the open sky. Avoid areas that will have delayed or false readings.

Remember, Warmzone includes free installation support with your heated driveway system, so if you have any questions, call a radiant heat expert at 801.948.7577.

The Makings of an Industry Leader

Unmatched Customer Services and Proven Radiant Heat Solutions

What does it take to become an industry leader in the radiant heat business? As an industry leader of radiant heat solutions, Warmzone has set the gold standard. Built on top quality products, superior customer service and solid manufacturer warranties, Warmzone is always innovating, testing and developing new and better products for customers.

Snow melting mats and cable being installed for heated paver driveway

Of course, shopping Warmzone gives customers the assurance they are buying the most proven and advanced radiant snow melting solutions, at truly competitive prices. Warmzone has been around for a long time, and has forged relationships with radiant heat manufacturers and installers across the country. They also maintain bragging rights to an impressive group of in-house radiant heat consultants, staffers who have been entrenched in their business with a strong command of everything radiant heat related.

Warmzone holds its products to ASHREA industry standards, creating a good foundation for great radiant heat solutions. Adhering to these standards is all about breaking it down regionally—examining the weather, climate, average snowfall, temperatures, and other factors that play a role in overall system design to ensure each system is optimized for its location. Warmzone designs custom systems in accordance with these standards for consumers throughout the U.S. and Canada.

Warmzone further differentiates itself with outstanding customer service. From free installation training to personal, expert installation support, Warmzone is there every step of the way to assist you through the installation process. Systems are designed to meets customers’ snow melting and budget needs. And the wide selection of products and systems ensures each customer will receive the ideal solution for their snow melting needs.

Large heated paver driveway

Offering complementary system design services and installation support are other reasons why builders continually deal with Warmzone. Warmzone radiant heat experts thoughtfully consider all of their customers’ system requirements to design systems on a case by case basis. Customers receive a detailed layout (AutoCAD if requested) that includes critical power requirements and specs prior to any installation. This helps to ensure that there are no “surprise” expenses and that your system is installed correctly.

There’s a whole lot more to talk about, but one thing is clear—Warmzone continues to stand on its own as an industry leader in radiant heat solutions for both residential and commercial customers. For the most innovative radiant heat systems, free installation training, helpful customer support, comprehensive design and installation services, contact Warmzone at 888.488.9276.
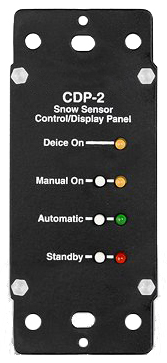