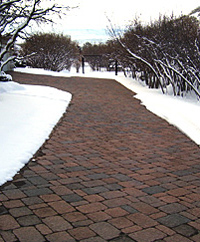
Tag Archives: heated driveway installation

Questions About Installing a Snow Melting System?

Installing a snow melting system is one of the best ways to give any home or business a much-needed upgrade this fall. An industry-leading snow melting system from Warmzone is an investment that will enhance safety and convenience each winter. Without the hassle of back-breaking shoveling, any homeowner can stay warm and toasty during winter storms, while pedestrian traffic remains safe.

With multiple options suitable for any application or medium, making the right choice can be tough. At Warmzone, exceptional customer service means anticipating questions and concerns that customers have. If you’re thinking about adding a radiant heated driveway to your home or business, please call a friendly radiant heat expert today at 888-488-9276. Also, check out these frequently asked questions about snow melting systems.

How do heated driveways work?
Heated driveways are an energy-efficient, environmentally friendly way to keep any driveway free of snow and ice. Warmzone’s heated driveway systems are fully automated, and include a heating element, activation device, and controller. This means that the snow melting systems only operate when weather conditions warrant. When the activation device (either a pavement-mounted snow sensor or an aerial-mount sensor) detects moisture, and the temperature is below the set point (usually 39°F), it signals the system controller. The controller then sends power to the heating element that is embedded in the driveway. The heated area will begin to warm, preventing any snow accumulation.

What are my layout options?
Warmzone has an array of trusted products and endless customization options to suit the needs of any home or business owner. Based on your budget and performance needs, Warmzone’s professional designers will create a custom configuration, utilizing the best components for your project. ClearZone heat cable is the trusted option for keeping driveways, sidewalks, ramps, steps, and more clear of snow and ice. The versatile heat cable is available off spools or pre-spaced in mats for quick and easy “roll-out” installation. ClearZone snow melting systems are proven systems that have been installed in residential and commercial applications throughout the country.
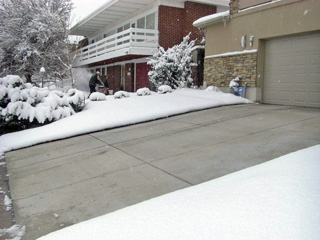
Heated driveway

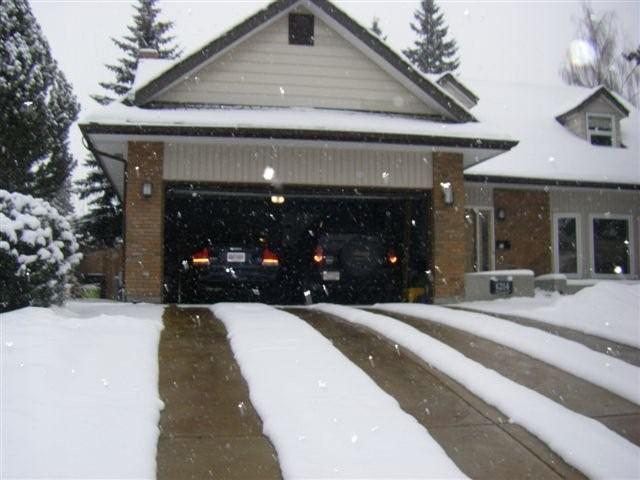
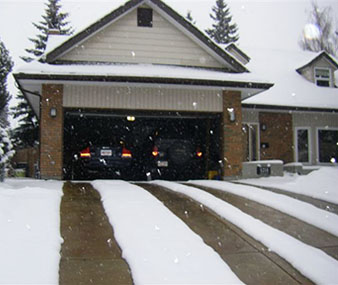
Warmzone professionals can customize your snowmelt system to meet virtually any layout requirement, as well as accommodate your budget. When working with Warmzone, you have a wide range of options for your snow melting needs. For example, instead of heating your entire driveway, you may prefer heating only an 8-foot wide strip in the middle of the driveway. Or you can install two 24-inch wide tire tracks for the length of the driveway. You may also choose to only heat trouble areas, such as inclines, or a section of the driveway that is always shaded, or areas with high-traffic. Warmzone professionals have decades of experience designing custom radiant heat systems that meet the specific requirements of our customers. Whatever your snow melting needs and budget are, Warmzone professionals will create the ideal system for your project.

Is installation difficult?
Snow melting systems are not difficult to install, but it is vital to have a qualified electrician wire the system (to ensure that the warranty remains valid). Keep in mind that a snow melting system is only as good as its installation, so take advantage of Warmzone’s industry leading customer support services, such as the free installation training and technical support. Radiant heat experts are available anytime for questions, and instructional videos are also available online to assist you during installation. Taking advantage of these services will prevent stress and save time during installation.

Following proper installation techniques help to ensure that radiant heat systems perform as intended. Here are some basic guidelines when installing a snow melting system:

Never cut or alter the heating element.
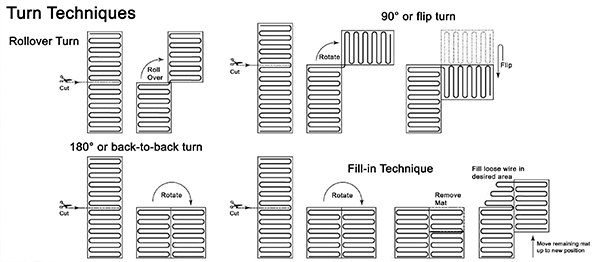
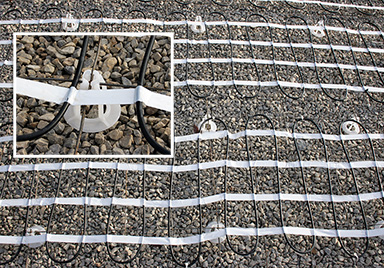
ClearZone snow melting mats may be cut to size and trimmed on-site, but do not cut the actual cable. If there is extra cable, utilize it by decreasing spacing (minimum spacing is 2-inches) or routing cable around the perimeter within the heated area. To make turns, cut the tape backing of the mat (not the cable) and then route the cable accordingly.

Heat cables must never touch, cross, or overlap.
Touching cables will cause cable burnout due to excessive heat. Always maintain a minimum spacing of at least 2 inches.

Use special care when working around the heating cable.
Tools such as trowels, shovels, or rakes can damage cable. If possible, avoid using steel trowels, and take care when using shovels during concrete or asphalt installations.

When working with concrete, heat cable must be attached to remesh with zip ties or cable strapping.
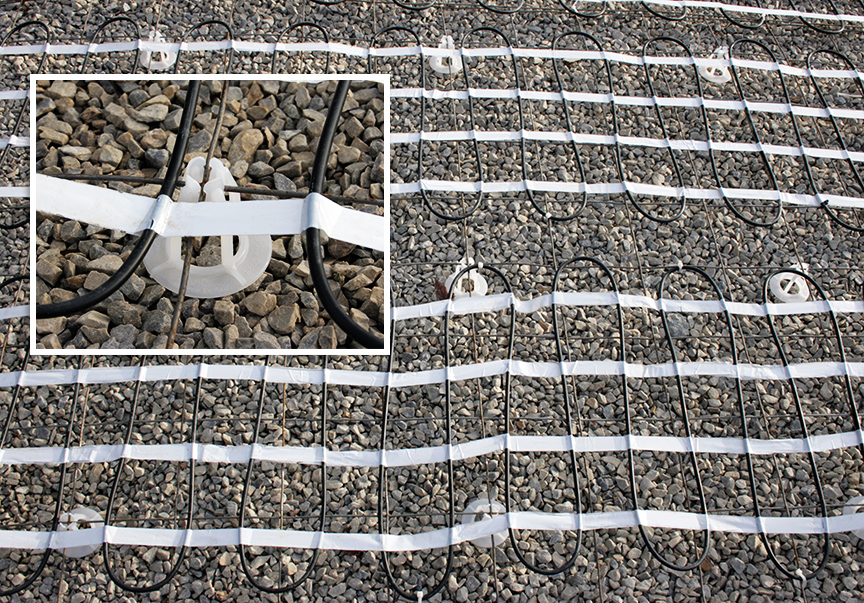
Use Mesh-Up support chairs for the remesh and then secure the heat cable to the remesh. This helps to prevent the cable from being pushed down by the weight of the concrete pour. The heat cables should be about 2-inches below the driveway surface for optimum performance.

Heating cable should never pass through or cross an expansion joint.
Heat cable must be ¾ to 1-inch from the bottom of a control joint and isolated to a single pour area. When installing in concrete, never run the cable through an expansion joint.

What are the power requirements?
Warmzone’s automated snow melting systems only run when conditions warrant, so they are very efficient. Prior to the installation, have a qualified electrician evaluate the available power. Typically, homes have either a 100 or 200 amp breaker panel. For most snow melting systems, one 30-amp breaker is enough to heat a 170 square-foot area. That means heating 350 square feet requires two 30-amp (or one 60-amp) breakers. If the power at your home is insufficient, it is still possible to reap the benefits of a snow-melting system.

Warmzone designers can employ a technique called zoning. The area to be heated is divided into individual zones. Power is sent to each zone separately to optimize available power. Warmzone also offers a new sequencer that will “bounce” power from zone to zone. This sequencing allows larger areas to be heated almost simultaneously with a minimal increase in melt time. This technology is far more efficient than traditional prioritized zoning. With Warmzone’s industry-leading technology, any home or business can enjoy an automated snow melting system.

How much do heated driveways cost, and what are the operating costs?
Warmzone designs snow melting systems according to ASHRAE standards, whereby the average temperature and snowfall of each location is taken into consideration. This ensures that Warmzone snow melting systems are effective and cost-efficient. For an average snowstorm, the operating cost of a radiant heat system is usually less than what you’d pay for a professional snow removal service. Keeping areas free and clear of snow each year is no longer a chore, and can save you a great deal of time and stress. Radiant heat for snow melting also extends the life of concrete driveways and walkways. Abrasive snow removal methods, chemicals, or salt are no longer necessary, keeping concrete looking new for years to come. Determining approximate operating costs can also be done with a simple calculating operation costs formula.

What kind of support services does Warmzone offer?
Warmzone prides itself on its premier customer service offerings. Working with Warmzone starts with professional design services for every client. An experienced radiant heat system designer will work hard to consider every aspect of your project in order to meet your snow melting needs and your budget. Customers will receive a detailed AutoCAD that provides all the necessary information needed before installation. The layout, materials, and all electrical information such as load calculations, number of breakers, and breaker sizes are all included.
Warmzone also offers free installation training and technical support for installers. Professionals are available to answer questions anytime and training is available online via web conference, or in person. You can also access the wealth of online resources Warmzone has available. Whatever you need, Warmzone’s dedicated and trusted experts will provide superb customer service through every step of the process.

For more information, call a friendly radiant heat expert today, at 888-488-9276.

How to Avoid Common Heated Driveway Installation Mistakes

Automated radiant snow melting systems can keep driveways, sidewalks, steps, ramps, and more free of snow and ice during the cold winter months. The systems are designed to detect temperature and precipitation, so when weather conditions warrant, the system activates. The surface is then warmed to prevent snow from accumulating. After the snowstorm the system remains on for a short time to dry the area so that slick sheets of “black” ice don’t form.

Although the installation of these systems is relatively simple and straightforward, there are still some common mistakes made by installers. Fortunately, there are several steps you can take to avoid common blunders and ensure a timely, proper installation so that your radiant heating system meets all your expectations. Most installation mistakes can be avoided simply by taking advantage of Warmzone’s comprehensive installation support services.

Ways to Ensure a Proper Installation

Take advantage of Warmzone’s Industry-Leading Support Services

Perhaps the biggest mistake installers make is not taking Warmzone’s free installation training courses. This valuable training is provided by an experienced instructor who will cover all the aspects of your installation. This is a great way to learn the basics of installing automated snow melting systems, and can help you avoid mistakes that could adversely affect the performance and longevity of the system. The courses are available online via web conference and are typically completed in less than an hour. However, installers can stop and ask the instructor questions at any time during the training.

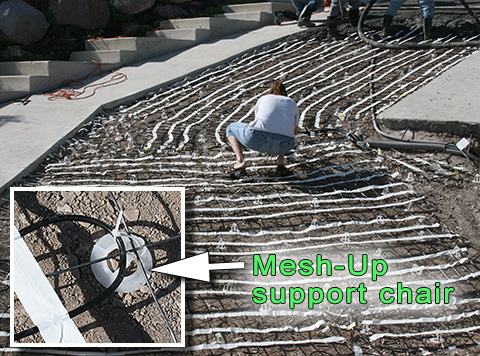
Mesh-Ups under remesh, to support the heat cable
Snow melting heat cable secured to remesh with Mesh-Ups, which are used to prevent the cable from resting on the ground.

Another way to help ensure a proper installation is to follow the professional system design and layout provided by Warmzone. Unfortunately, it’s all too common for installers to fail to follow the professional system design and layout given to them. Warmzone provides detailed layouts of the system to install, which includes the precise layout of the heating elements, materials and components, and dimensions of the system, as well as the proper load calculations, breaker sizes, number of breakers, and so on. Be sure to refer to the AutoCAD layout frequently as you install the system. These professional system layouts serve as the “road map” to a successful installation, helping to ensure that the system operates at peak efficiency after being installed.

Warmzone products and snow melting system components are second to none; however, even the best components cannot overcome improper installation techniques. So take advantage of the free training, system layout, and other support services offered by Warmzone. Our installation support staff is the best in the business, and we stand ready to assist you at any time during the installation. To learn more about installing radiant driveway heating systems, call Warmzone today at 888-488-9276.

Avoid Making These Common Installation Mistakes

To make turns with the mats, cut the tape backing and arrange the mat accordingly. (See the illustration below. Never cut the cable.)

Making turns with radiant heating mats.
Cut the tape backing and then arrange the heating mat accordingly to make the desired turn. (Avoid damaging the heat cable.)

Periodically Test the Heat Cable. Be sure to conduct OHM tests of the cable before and throughout the installation process. Write the results on the warranty card provided. (Follow the instructions in the Installation Manual to ensure that your warranty remains valid.)

Check Your Components Prior to Beginning the Installation. Prior to applying the concrete, asphalt or pavers, lay your heat cable out in the area to be heated and make sure you have the right amount of cable. Also, in concrete applications, always secure the heat cable to the remesh at regular intervals. Use Mesh-Ups® support chairs to keep the remesh from resting on the ground during the pour.

Refer to the Appropriate Installation Documentation. Always follow the instructions listed in the installation manual.

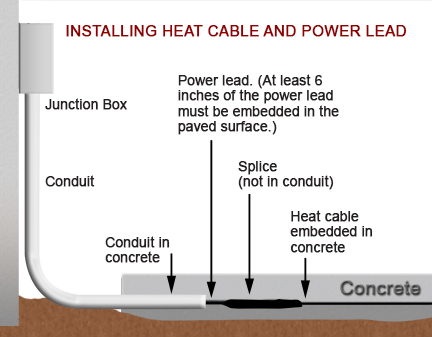
Make sure the splice and at least 6 inches of the power lead is embedded in the paved surface.

Embedding the cable splice

Install the Snow Sensor in a Proper Location. Surprisingly, this is a common mistake. Never mount the sensor next to a wall or in an area where it is not exposed to the weather. When installing an aerial-mount snow sensor (WS-2C, WS-5C) make sure it is mounted above the roof line. It must have an unobstructed 360-degree view of the sky to properly detect falling snow. Any nearby obstructions can prevent snow from falling onto the sensor, delaying or preventing it from triggering the system.

Never run Heat Cable (or mats) Through an Expansion Joint. All heating cable should be isolated to a single pour area.

Use the Proper Equipment. Do not use sharp metal trowels and shovels when tamping or spreading the concrete over the radiant heating cable. Great care must be taken to avoid damaging the outer jacket of the snow melting cable.

Never cut the Heat Cable. When making turns with the heating mats, only cut the tape backing, and then arrange the mat accordingly for the turn.

Heated tire tracks in driveway

Do not Allow the Heat Cable to rest on the Ground Prior to Applying Concrete. The cable should be elevated so that it is within about 2-inches of the driveway surface. Small plastic Mesh-Ups® support chairs can be fastened to the remesh, providing support and preventing the heat cable from being pushed to the ground.

The ideal time to install radiant heat is during new construction. However, driveways can also be retrofitted with radiant snow melting systems. Saw-cut technology is used for concrete driveways, providing channels for the heat cable, and then special epoxy is used to seal the cable in the driveway. For existing asphalt driveways, the heat cable is placed over the old asphalt and a new layer of asphalt is then applied directly over the cable. (Contact Warmzone to learn more about our special asphalt heating cable.) Talk to a radiant heat professional today to learn more about retrofitting your driveway or other areas with radiant heat. Call 888-488-9276 today.

Warmzone maintains relationships with experienced, positively reviewed installers throughout the country, so regardless of your location, we may be able to recommend a qualified installer in your area. If you have any questions during your installation, please don’t hesitate to call one of our support staff. We are here for you, so take advantage of the training and personal support.

Power Requirements and Operating Costs of a Heated Driveway

Understanding the Power Requirements for a Heated Driveway

Are you looking to install a radiant heated driveway for your home or business? If so, one of the first questions you need to answer is whether you have the necessary power requirements. In most cases, having the power needed to run an efficient radiant snow melting system is not a problem. However, prior to any installation, customers must ensure that they do meet the power requirements for heating their driveways and or walks.

Heated driveway with four heated tire tracks

So, just how does one go about determining the power requirements for heating a specific area and how does one know whether the necessary power is available? First of all, you don’t have to figure this out by yourself. Warmzone’s experienced reps are happy to work with you to not only help you determine the necessary power requirements, but to design a system that best meets your specific snow melting and budget needs.

But homeowners should be aware of some basic guidelines when shopping for radiant heat. For example, one 30-amp breaker supplies enough power to heat a 170-square foot area. To heat a driveway of 350-square feet, two 30-amp breakers (or one 60-amp breaker) would be needed. Homeowners can check their home’s main breaker panel to see the power coming into the house. (Typical homes feature either two 100 amp panels or two 200 amp breakers. These are located at the top of the main breaker box, above the main breaker panel.) But the bottom line, in terms of power requirements, is that an electrician is ultimately the one to address all power issues. If you have questions about available power, talk with Warmzone as well as a qualified electrician to make certain there are no issues should you choose to move forward with the installation.

If you’re unsure of the square footage of your driveway, no worries; Warmzone can calculate that for you too. In most areas, using a special state-of-the-art technology, Warmzone can measure the area of your driveway while talking on the phone with you. Our helpful staff will work closely with you to ensure that the square footage of the area is measured correctly and the power requirements are therefore calculated properly.

Zoning Your Driveway Heating System

On rare occasions when there is insufficient power available to operate a large driveway heating system, the radiant heat system can be laid out in zones. Each zone is powered separately. As a storm first hits, zone 1 would power up and melt the snow in that area of the driveway. After zone 1, zone 2 would then activate to melt the snow in that area of the driveway. Click here for more detailed information about zoning your heated driveway.

Determining the Operating Cost of an Electric Heated Driveway

Homeowners are also keen to know the general operating costs of a heated driveway. Because radiant snow melting systems are specially designed for the specific demands of the average temperature and snowfall of their location, no two radiant heat systems are exactly alike. However, there is a formula that can be used to help you determine the approximate operating cost of a snow melting system.

General Guidelines to Determine a Heated Driveway’s Operating Cost

  1. Determine the total square footage of the area that will be heated. (The average American home has an 800 square foot driveway.)
  2. Multiply the square footage by the heat required (37 watts per sq. ft. for residential). This will give you a total for the watts per square footage required.
  3. Divide this number by 1,000 to convert to kilowatts.
  4. Look up the kilowatts-per-hour rate from the local power utility company.
  5. Multiply the kilowatts by the kilowatt rate. This gives you the cost-per-hour of usage for the snow melting system.

EXAMPLE for heating an 800 square foot driveway:
800 (sq.ft.) x 37 (watts) = 29,600 (total watts).

29,600 divided by 1,000 = 29.6 kw per hour. (This is what the power company will charge you per one hour of operation.) The average utility rate is .12 cents, therefore: 29.6 x .12 = $3.55. The cost of operation would be $3.55 per hour.

The operating cost of an automated snow melting system is typically less than that of hiring a professional snow removal service. And radiant heat can help to extend the life of concrete driveways and keeps them from being subjected to abrasive snow removal methods or harsh snowmelt chemicals or salt. Safety is particularly important for business owners who wish to avoid costly litigation due to personal injuries caused by slick ice. For more information on driveway heating systems, call Warmzone today at 888.488.9276.

Other helpful, informative web pages:

  1. ClearZone snow melting
  2. Heated Driveways
  3. Installing a Heated Driveway
  4. Snow Melting System Installation Tips

Contractors Benefit from Working with Warmzone

Proven Radiant Heat Installers Gain Repeat Business from Warmzone

Warmzone Connects Experienced Contractors with Customers to Deliver Top-notch Radiant Heat Installations

As a contractor, are you interested in increasing your business? Are you looking for a radiant heat solutions provider you can trust? As a premier provider of radiant heat services, Warmzone has a longstanding reputation for connecting the best talent with their customers, generating more business for contractors, and greater peace of mind for consumers. So radiant heat installers benefit by partnering with Warmzone and customers benefit by having a proven, experienced contractor install their system.

Warmzone keeps track of radiant heat installers and their performance; thereby maintaining a map of the top independent installers throughout the country. This assists customers in identifying the most reputable professionals in their area to install radiant heat. Initially, professional builders teamed up with Warmzone because of its trusted products and unmatched customer support. Now, knowing that they can gain additional jobs adds even more incentive for installers and also benefits consumers as well. Currently, Warmzone can recommend preferred installers in virtually any region of the country.

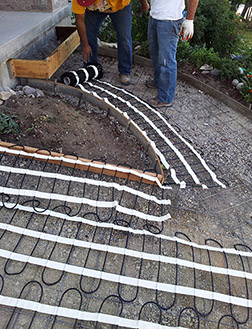
Heated sidewalks being installed

Warmzone’s extensive catalog of proven products, awareness of current trends and profound industry knowledge currently supports a vast network of installers across the country. These resources provide impressive technical support, including complete system design and layout services, free installation training, “how-to” videos, and personal installation support. These resources are supplemented by the vast instructional documents and diagrams provided in Warmzone’s library of system manuals and technical guides residing on Warmzone’s website. Installers can put this wealth of online information to work for them and allow them to install radiant heat systems with confidence.

In addition to the online information, customers can utilize Warmzone’s free consulting services so they can make the best decision when it comes to purchasing and installing a radiant heat system. Warmzone is more than a provider of radiant heat – Warmzone is a partner that is committed to offering the best customer service in the business. We are determined to see that your snow melting, roof heating or floor heating system is installed properly and performing as expected.

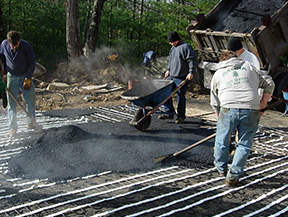
Applying hot asphalt over heat cable mats

Contractors and installers have come to particularly appreciate Warmzone’s free installation training courses. Here a radiant heat expert covers all the aspects of installing a radiant heat system. Again, this benefits the installer and the customer. If the installer still encounters any questions during the installation process, he can speak to one of our dedicated support staff to assure that the installation goes off without a hitch. Installers are never left out in the cold when they work with Warmzone. Our goal, of course, is to give construction professionals the resources and the confidence they need to add radiant heat installation to their menu of services and provide the best service to our customers.

When it comes to all things radiant heat, Warmzone is the perfect partner. If you’re a contractor, it’s a great time to team up with professionals who have your back, and improve your bottom line. As a homeowner, you’ll enjoy peace of mind knowing you have a trusted installer and team of experts working for you. To learn more, call Warmzone at 888.488.9276.


Visit Warmzone.com for all things Radiant Heat

If you’re currently contemplating a radiant heat solution for your home, Warmzone can help you stay on top of your radiant heat installation with a comprehensive library of online resources. Whether you choose to purchase that top shelf solution from your local big box hardware store, or enlist our help, these online resources are absolutely free and available whenever you need them.

Rather than mucking blindly through a home improved project, it is the informed consumer that makes the best decision. And keep in mind: a radiant heat system is only as good as its installation, so it pays to work with a professional who will walk you through the entire purchase and installation process.

The prospect of researching a radiant heat project can be overwhelming if you don’t know where to look. Warmzone.com takes a deep dive into all aspects of radiant heat, allowing you to research and compare systems efficiently, including individual components and applications. The site helps you begin the process of discovering and weighing all of your options to help you make better decisions when you shop. It will also open you up to the realm of creative possibilities a radiant heat system home improvement project provides.

Beyond the initial shopping experience, we’ve made it easy for consumers by providing free consulting and an extensive library of online resources available whenever you need them. You’ll find high level overviews of radiant heat systems including their benefits, how they operate and current applications. You’ll discover an extensive archive of articles on a range of topics, as well as technical guides, installation videos, installation manuals and system component specs to suit your project needs. Here’s a sampling of the many topics you can expect to see the Warmzone archives:

In addition to this information, Warmzone offers instructional videos you can watch in real time to help you move through all aspects of a radiant heat project, whether you are installing a heated bathroom floor, a gutter-trace system or installing heat cable for your heated driveway.

Choosing Warmzone products yields big dividends for do-it-yourselfers and the most conscientious customers. By tapping a premiere provider, you benefit from the best in radiant heat technology and services available. Warmzone invests years of deep industry knowledge and experience into finding high-performing, cutting-edge radiant heat solutions for customers backed by impressive resources. Their professional design services team custom designs each radiant heat system to ensure it meets your project’s specific needs in terms of performance, installation complexity and price. You’ll know what to expect, every step of the way. Simply bring your creativity and budget requirements to Warmzone. Once you have a system design in place, our dedicated staff of experts are there to assist you throughout the purchase, design and installation process.

Whether you’re researching, shopping, or elbow-deep in an installation, you can call our technical support team or reference Warmzone.com, which is always available. We take pride in offering the most comprehensive library of information available on all-things radiant heat related to help make your project a success. Call today for more information: 888.488.9276.

Installing a Heated Driveway

How is a Heated Driveway Installed?

Whether you’re looking to install a radiant snow melting system in concrete, asphalt, or under pavers, it doesn’t take much to make a heated driveway a reality. The important thing to remember is that a radiant snow melting system is only as good as its installation. That’s why Warmzone emphasizes customer support services such as free training and personal installation support. But how is a heated driveway system installed?

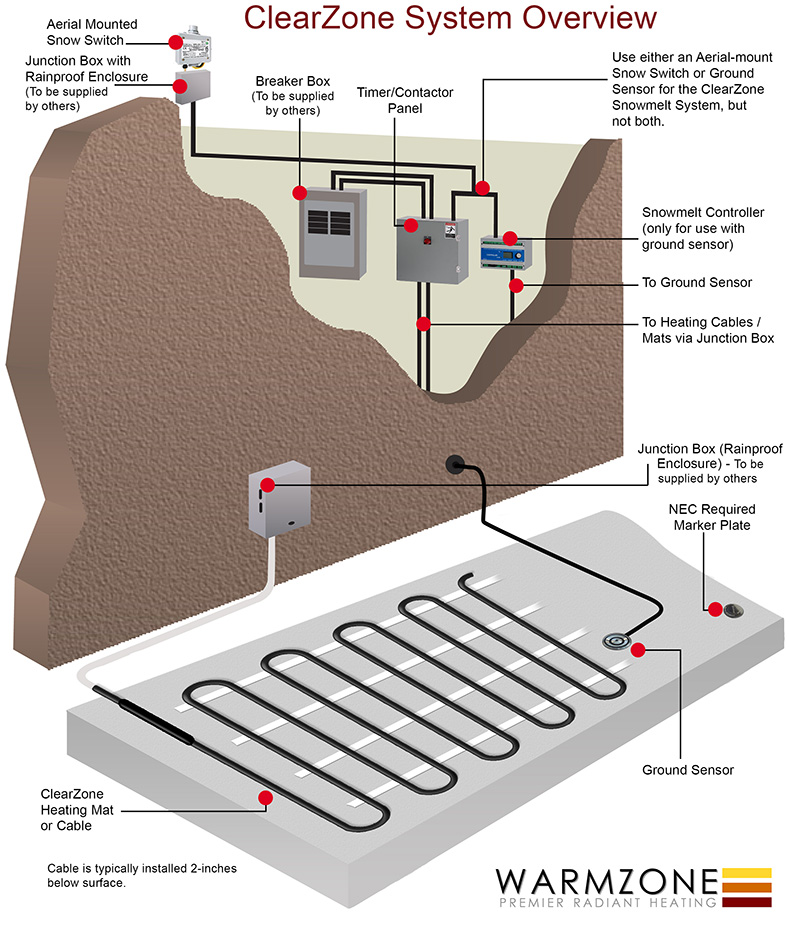
Snow melting system overview

Click image to enlarge.

First, a Warmzone radiant heat expert will work with you to determine the specs and products that will best meet the specific needs of your custom project. After verifying receipt of the heat cable and system components, prepare the area where the system is being installed. Make sure there are no nails, sharp rocks or other items present that can cause damage to the heating cable.

Heated driveway installation with Mesh-Up supports

If you are installing a concrete heated driveway, install wire remesh in the area to be heated. Once the remesh is laid out, heat cable is then installed and secured to the remesh using zip ties.  This keeps the cable from shifting during the concrete pour. Mesh-Up plastic supports are then installed to lift the remesh and prevent the heat cable from resting on the ground. (The heat cable should be about two inches from the finished surface.)

With the Mesh-Ups installed and the cable secured to the remesh, concrete can now be poured over the heating cable/mats. Take care to not damage the heating cable. A typical slab is 4-inches thick. Follow your concrete contractor’s installation methods and follow all building codes. The heating cable is to be within 2-inches of the finished surface.

Mesh-Ups under remesh, supporting heat cable

Click image to enlarge.

Most heated driveway systems utilize an aerial mount snow sensor to activate the system. This is typically installed at the roof’s edge where it has open access to the elements. When precipitation is present and the temperature is below the set point (usually set at 39°F), the sensor signals the contactor panel and power is then sent to the heat cable.

View additional “How to” Videos from Warmzone.

Important Note: For warranty and safety purposes, it is necessary for a qualified electrician to connect the system.

Installing a Radiant Snow Melting System (Part II)

Repaving and Retrofitting Asphalt Driveway with Radiant Heat

Continued from Installing a Radiant Snow Melting System (Part I).

The ClearZone snow melting system is unique because it isn’t limited to new construction applications and can withstand the rigors of concrete pours and hot asphalt. If you have an existing asphalt driveway and intend to re-pave it, you can retrofit your driveway with a ClearZone snow melting system. The heat cable is secured to the existing asphalt with clips and nails and only needs to be embedded under just ½-inch of asphalt. The new asphalt is hand shoveled onto the cable and then compacted. ClearZone cable is simple to install and provides the best performance for heating asphalt driveways.

Fully Automated

The heat cable is wired to the master controller, which is usually mounted on a wall in the garage. An aerial or pavement mounted snow sensor is wired to the controller. When the sensor detects precipitation and the temperature is below a set point (usually 39°F.), it signals the controller, which then sends power to the heat cable to warm the driveway. While the system is fully automated, the controller also features manual override capability for times when you may need to melt a snow drift or ice that formed in a shady spot.

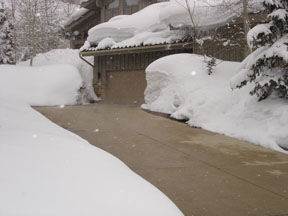
Heated concrete driveway for mountain lodge

In addition to the many different types of surfaces that the ClearZone snow melting system can be installed under, you have many custom configurations that you can choose from. Warmzone will work closely with you to keep within your budget while providing the optimum snow melting system for your needs. As a leading provider of radiant heat solutions, Warmzone will provide a detailed design of your snow melting system so that you know all the electrical and layout requirements prior to any installation. Warmzone also provides you with technical support during the installation.

Once installed, radiant snowmelt systems are virtually maintenance free, and in addition to helping preserve the quality of your concrete/asphalt driveway or sidewalks, it also eliminates the damage caused to surrounding grass and vegetation from salt and corrosive snow melting chemicals. With your radiant heat snow melting system, there’s no need to apply salt or harsh snow melting chemicals to your driveway. So enjoy those snowy mornings from the warmth of your living room and admire your clear driveway as you sip your hot coffee. The days of shoveling and salting are over.

When it comes to installing a snow melting system, it pays to work with the best. In addition to Warmzone’s competitive pricing, you’ll receive top-notch customer service. Call and talk to a radiant heat expert today (888.488.9276) to learn more about heated driveways and snow melting systems. You can also send Warmzone your project information and receive a free radiant heat quote. There’s no obligation.

Go back to Installing a Radiant Snow Melting System (Part I).

Tips for Successful Radiant Heat Installations

Installing a Radiant Snow Melting System

A radiant heated driveway is only as good as its installation, which is why it’s important to carefully follow best practices. As long as you remember a few simple tips, your snow melting system will be up and running in no time, and in good working order for years to come.

Installing heating cable in mats for heated driveway and sidewalk

This may seem like a no brainer, but it’s important to make sure you have the right products for your installation before you lay one foot of cable. Before every job, remember to check the voltage and the wattage of the heating cable (usually indicated on the box). If you’re unsure, you can always contact Warmzone for confirmation and/or recommendations.

A key to successful installations is to use a megohmmeter to perform OHM tests of the heat cable before removal from the box, during, and after the installation. This can save you some headaches in the long run and help to ensure a successful install. Be sure to document the results in order to establish the manufacturer’s warranty.

You have everything you need to construct the driveway of your dreams. Before you roll out any cable, here are a few rules to remember at installation time to prevent cable damage and get the most out of your system:

  • Never cut, cross or overlap the heating cable. Heat cable should not be altered under any circumstances, as it may cause overheating, resulting in damage to the cable.
  • Always embed the cable completely. Leave no air around the cable.
  • Make sure to embed the factory splice (where the heating cable and power lead meet).
  • Using a megohmmeter, perform OHM tests of the heat cable before removing the cable from the box, during the installation, and after the cable has been laid out.
  • Always run the cold lead in conduit (power lead for the heating cable) – it is not direct burial.

For asphalt applications, snow melting cables are normally covered by two inches of asphalt. To prevent heat damage, the asphalt should be allowed to cool to 220°F. (105°C.) before pouring directly onto the mats or cables. Ground sensors/tubes should not be exposed to temperatures above 176°F. (80°C.).

And, for a proper sensor installation, both ground and aerial activation devices require a clear, 360-degree “view” of the sky to allow snow to fall onto the sensor plate. If drifting is an issue where the snowmelt system is being installed, it’s best to install a ground sensor.

For more installation tips, read our helpful Installation Overview web pages:
Installing Snow Melting Systems
How to Install a Heated Driveway (in Concrete)

Of course, you should always read the Installation Manual and follow instructions. Or you can always call Warmzone at 888.488.9276 for on-the-job installation support and service.

Installing Radiant Heat in Asphalt

Asphalt Heated Driveways
When you combine the durability of asphalt with the automated snow removal capabilities of a radiant heated driveway, you get a winner. Asphalt heated driveways feature energy efficient, maintenance-free operation to keep your driveway safe and clear of snow and ice. If you’re considering a new asphalt driveway, a refresh, or even if you’re already enjoying the benefits of asphalt, there’s still time to include a radiant heated driveway in your plans.

Radiant heated driveway in Denver, Colorado. Asphalt and heated driveway systems go together for several reasons. First, they are durable, and engineered to withstand extreme heat, freezing and thawing. They also adapt easily to the environment. Asphalt pavements flex and “give” with significant settlements of frost heave, while Warmzone snow melting systems respond to the weather, operating only when conditions indicate that snow is on the way.

Applying hot asphalt over heat cable mats

ClearZone heat cable is specifically designed to withstand the hot temperatures of new asphalt construction jobs. In the case of a new driveway install, the asphalt is spread directly over the rugged ClearZone heat cable and then compacted. In one day, you can have a new driveway and a fully operational snow melting system. The embedded, fully automated, radiant heat snow melting system provides a discreet, reliable snowmelt solution for your driveway.

If you’ve already got an asphalt driveway, but it’s in sore need of repair, placing an overlay on the existing surface can be easily accomplished. As with the new pour, ClearZone snow melting cable can be installed just before the overlay. After a quick patch, a surface of about 2 inches is all you’ll really need for your driveway, and your new snow melting system installation.

If you’re not in the market for an asphalt refresh, no worries. Your existing driveway can be retrofitted with radiant heat. Grooves are cut in the existing asphalt, using asphalt saw-cut technology, and the heat cable is then placed in the freshly cut grooves. An epoxy topcoat is then applied as a sealant over the newly embedded cable. For additional traction and safety, a sand broadcast can be applied to the surface before the epoxy.

Fitted with a ClearZone snow melting system, an asphalt driveway is a cost-effective option for your home, and will last for years with only minimal maintenance. With radiant heat in the mix, you can also factor in all of the money you’ll save on snow removal services, snow melting chemicals and gas for your snow blower. And of course, there’s the gift of time. While your neighbors are out shoveling, snow blowing or tapping their watches waiting on their snow removal service, you’ll be in your car and on your way.

Need to do some more homework on this one? Learn more about the many options available by reviewing our website or call Warmzone today, at 888.488.9276. Receive a free quote for your radiant heating project.

Proper Installation Techniques

Installation Tips for Installing an Electric Snow Melting System

Winter is supposed to be colder and snowier than ever this year. If you’re living in the snow belt, you can meet the snowy weather with a solution that’s sure to make your winter much more bearable. From installing radiant heated floors to heated driveways and roofs, Warmzone makes the process of tackling a radiant heating project much easier.

Heated driveway with four heated tire tracks

Before installing any heat cable, it’s important to know the ins and outs of radiant heat installation to maximize the performance of your system and ensure that the warranty remains valid. In addition to Warmzone’s free consultation and installation support, a wealth of information is also available online in Warmzone’s radiant resource center, where you can find articles, installation manuals and related information.

Basic Tips for Installing Snow Melting System
Cable Care – Extreme care must be used to ensure the cables/mats are not damaged when using sharp tools, wheelbarrows, shovels, rakes or heavy machinery.

Check Supply Voltage – Make sure that the supply voltage matches the voltage required for your specific snowmelt product.

Measure Cable Resistance – Remember to always measure, verify and record the actual resistance of the heating element throughout the installation process:
1.  Out of the box
2.  After laying the cable out
3.  After applying the surface material

Never cut the Heat CableHeat cable is resistance cable. When it is shortened it increases the wattage per foot of the cable. Altering the cable in this way can void the warranty and cause the heat cable to fail due to over-temperature.

Laying out Heating Mats – Unroll the heating mat on to the area you want to heat. Fasten the heating mat to the mesh reinforcement using tie-wraps, zip ties or cable strapping. Do not cause the heating cable of the mat to be compressed or strained.

Do not let Cables Touch – Never allow the heating elements to cross, overlap or touch.

Embed the Cable – Whether you’re installing in concrete, asphalt or pavers, make sure that the cable is completely embedded under the surface. If uncovered, it can malfunction in the area of exposure.

Embed the Power Lead – The power lead/heating cable splice and at least 6 inches of the power lead must also be embedded in the paved surface. The remaining power lead should be run through a conduit.

Making Turns with MatsHeating mats can be altered to accommodate drains, obstructions or bends in the layout. To make turns or alter the spacing of the heating cables in mats, only cut the tape – NOT the heating cable.

Ground Sensor Placement – The ground sensor must be placed between the heating cables within the heated area at least 3.3 feet (1 m) from the edge of the area. A minimum distance of 0.41 inches (1 cm) should be maintained between the sensor tube and the heating cable.

Aerial Snow Sensor PlacementAerial sensors should not be placed under eaves but where there is direct exposure to the open sky. Avoid areas that will have delayed or false readings.

Remember, Warmzone includes free installation support with your heated driveway system, so if you have any questions, call a radiant heat expert at 801.948.7577.

The Makings of an Industry Leader

Unmatched Customer Services and Proven Radiant Heat Solutions

What does it take to become an industry leader in the radiant heat business? As an industry leader of radiant heat solutions, Warmzone has set the gold standard. Built on top quality products, superior customer service and solid manufacturer warranties, Warmzone is always innovating, testing and developing new and better products for customers.

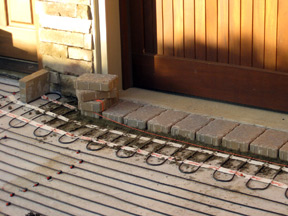
Snow melting mats and cable being installed for heated paver driveway

Of course, shopping Warmzone gives customers the assurance they are buying the most proven and advanced radiant snow melting solutions, at truly competitive prices. Warmzone has been around for a long time, and has forged relationships with radiant heat manufacturers and installers across the country. They also maintain bragging rights to an impressive group of in-house radiant heat consultants, staffers who have been entrenched in their business with a strong command of everything radiant heat related.

Warmzone holds its products to ASHREA industry standards, creating a good foundation for great radiant heat solutions. Adhering to these standards is all about breaking it down regionally—examining the weather, climate, average snowfall, temperatures, and other factors that play a role in overall system design to ensure each system is optimized for its location. Warmzone designs custom systems in accordance with these standards for consumers throughout the U.S. and Canada.

Warmzone further differentiates itself with outstanding customer service. From free installation training to personal, expert installation support, Warmzone is there every step of the way to assist you through the installation process. Systems are designed to meets customers’ snow melting and budget needs. And the wide selection of products and systems ensures each customer will receive the ideal solution for their snow melting needs.

Large heated paver driveway

Offering complementary system design services and installation support are other reasons why builders continually deal with Warmzone. Warmzone radiant heat experts thoughtfully consider all of their customers’ system requirements to design systems on a case by case basis. Customers receive a detailed layout (AutoCAD if requested) that includes critical power requirements and specs prior to any installation. This helps to ensure that there are no “surprise” expenses and that your system is installed correctly.

There’s a whole lot more to talk about, but one thing is clear—Warmzone continues to stand on its own as an industry leader in radiant heat solutions for both residential and commercial customers. For the most innovative radiant heat systems, free installation training, helpful customer support, comprehensive design and installation services, contact Warmzone at 888.488.9276.

Our Customer is Extremely Happy

Solution: ClearZone Snow Melting System

Warmzone did an awesome job with the installation of a heated driveway at our customers house. Nate is incredibly great to work with and we highly recommend you to all our clients. Our customer is extremely happy that he will not have to shovel his driveway this winter thanks to Warmzone.

SJM Tile and Masonry