Installation Tips – Installing a Snow Melting System in Asphalt

Installation Tips for Installing Snow Melting Heat Cable in Asphalt (Quick Reference Guide – Article 1 in a Series of 3)

Remember to check the element resistance and the insulation resistance of the heating cable/mat at the recommended intervals:

  1. In the box: Write the values on the warranty card.
  2. After being laid out: Write the values on the warranty card.
  3. After being covered: Write the values on the warranty card.
  4. Record your readings in the installation manual.
  • When laying out the cable, DO NOT allow heating cables to touch, cross, overlap or get bunched up. Minimum allowable spacing is 2 inches.
  • Do NOT place asphalt that is higher in temperature than the cable’s maximum rated temperature on the heating cables.
  • Heating cables should be securely fastened so they do not move or shift during the embedment process.
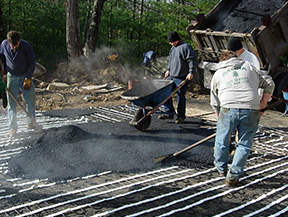
Applying hot asphalt over heat cable mats

  • Do NOT use a track application machine on the asphalt. Rubber tire applicators are okay as long as the asphalt temperature is below the maximum rated temperature for the heating cables.
  • The operating weight of the asphalt roller should not exceed 1,000 pounds. (The heat cable is designed to handle 8.9kN before the insulation is damaged, which will cause the cable to fail.) NOTE: A walk-behind roller imparts a force of between 5-18 kN.
    • Use a small power roller to compact asphalt over cable on sand, concrete, or ½-inch aggregate. A smaller roller will take more time, but decreases the chance of damaging the heating cable.
    • A roller with 30 kN or less is allowable when heating cable is in concrete and the concrete is then covered is asphalt.
    • When compacting/rolling on a grade, do not stop the roller. Stopping and resuming the roller may stretch and break the heat cable.
  • Do NOT dump large quantities of asphalt on small sections of the heating cables. Doing this may cause damage to the cable because of excessive, focused heat. Ideally, the asphalt should be applied by hand.
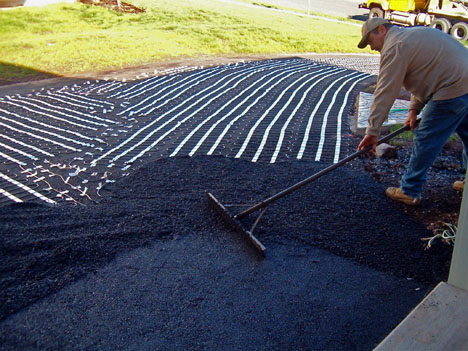
Installing a heated asphalt driveway

  • Do NOT cut or alter the heating cable. Mat tape may be cut, but the heating cable must never be cut.
  • Embed all of the heating cable and the splice in the asphalt. Allow asphalt to cool to a temperature of approx 212°F (100°C) before applying directly over the cable and splice.

Installing the cable splice in asphalt.

  • Manually lay the asphalt and spread the material evenly around and over the heating cables.
  • Heating cables are normally covered by 2-inches of asphalt. Leave a buffer of 4 to 6 inches of unheated asphalt around the edge of the heated area. This allows for adjustment of paving surface edges without damaging the heating cable.
  • Handle heating cables carefully – use extreme care with tools such as shovels, rakes and wheel barrels to avoid damaging the cables.
  • Verify cable integrity by checking resistance often during installation.
  • It is important that the snow melting system be wired by a licensed, qualified electrician and in accordance with local laws, codes, regulations, and NEC guidelines.
  • Ground sensors/cups should not be exposed to temperatures above 80°C (176°F).
  • A perimeter of a maximum of 12 inches of asphalt should exist around the embedded cables. This allows for adjustment of the paving surface edge without damaging the heating cable.

* This list is intended as a general quick reference guide. It is NOT a substitution for proper training and following the installation manual. Always read and follow the installation manual. Web-based training is available on request.

For more information about installing heated driveways and snow melting systems, visit Warmzone’s Installation Overviews web page. Warmzone also provides a host of radiant heat installation videos online as well. Call us today for more information at 888.488.9276.

Installation Tips – Installing a Snow Melting System in Concrete

Installation Tips for Installing a Snow Melting System in Concrete (Quick Reference Guide – Article 2 in a Series of 3)

Remember to check the element resistance and the insulation resistance of the heating cable/mat at the recommended intervals:

  1. In the box: Write the values on the warranty card.
  2. After being laid out: Write the values on the warranty card.
  3. After being covered: Write the values on the warranty card.
  4. Record your readings in the installation manual.
  • Ensure that all sharp stones and debris are removed from the area where the heating cable will be installed.
  • Place the remesh in preparation of the concrete pour.
  • Lay the cables/mats according to the plan and fasten them to the remesh or rebar (using plastic zip-lock ties) so that they do not move during the concrete pouring.
  • Do NOT allow heating cables to touch, cross, overlap or get bunched up.

wz-sm-Heating_Cable_Tips-Keeping_Your_Cable_Safe thumbnail

  • Do NOT cut or alter the heating cable. Mat tape may be cut, but the heating cable must never be cut. View the video How to Make Turns with mats.
  • Heating cable/mats should be spaced at no less than 2-inches center-to-center and no more than 4-inches center-to-center. This also applies to adjacent heating mats.
  • Secure the heating cable to the wire mesh or grid using plastic zip ties. Make sure that the cable/mats and the wire mesh are secure so that they will not move or shift when the concrete is being poured.
  • The heating cable will need to be positioned 2-inches from the surface of the concrete. Use wire remesh and Mesh-Ups or concrete dobies/chairs to position the heating cable within 2-inches of the surface. The heating cable/mat should never rest on the ground.

Placing Mesh-Ups under cable and remesh

  • Do not allow heating cable to cross an expansion joint. Control joints are allowable under the following conditions:
    • The joint is tooled or cut NO deeper than 1¼-inches.
    • A 6-inch piece of ¼-inch angle iron is recommended to protect the cable any place where a control joint will pass over it. The heating cable is tightly strapped to the angle iron with plastic zip ties.
    • Mark the forms where the angle irons are located to accurately place the control joints.
    • The cable must be ¾ to 1-inch below the bottom of the joint. (Do NOT tool joints deeper than 1½ inches. Stay above heating cables.)
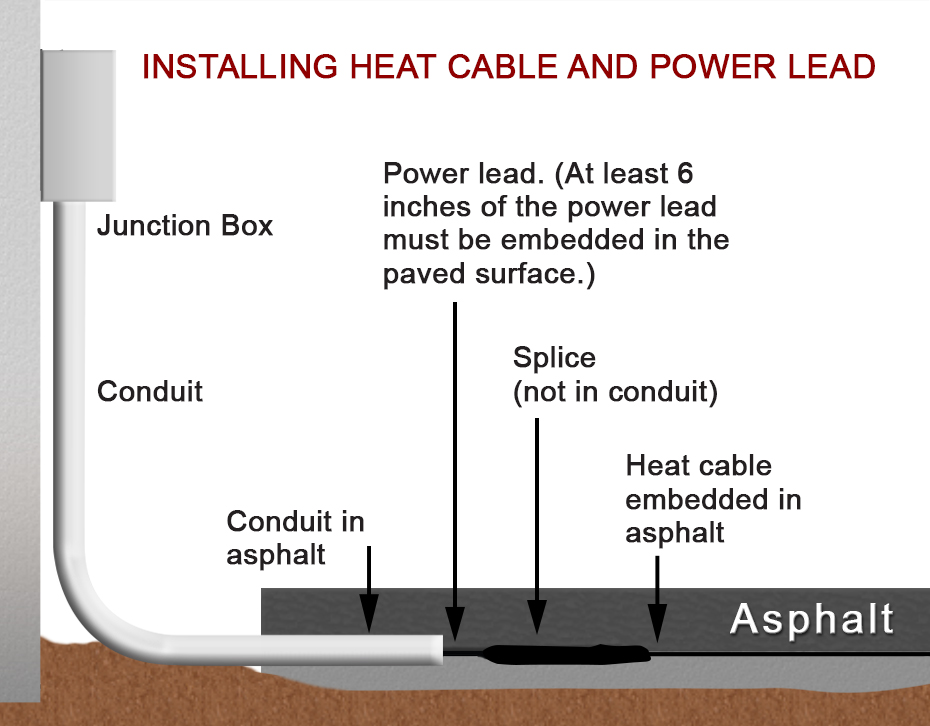
  • Embed all of the heating cable and the splice. The cold lead on the heat cable and mats is not rated for direct burial in earth and must be run through a conduit. (The first 6-inches of the cold lead and splice must be embedded in the heated surface.) See the illustration showing the installation of the heat cable and power lead.
  • Handle heating cables carefully. Use extreme care with tools such as shovels, rakes and wheel barrels to avoid damaging the cables.
  • Verify cable integrity by checking resistance often during installation.
  • It is important that wiring of the system is completed by a licensed and qualified electrician and in accordance with local laws, codes, regulations, and NEC guidelines.

* These tips are meant for quick reference. It is NOT a substitution for proper training and following the installation manual. Always read and follow the installation manual. Web-based training is available on request.

View Warmzone installation videos.

Installation Tips – Installing a Snow Melting System Under Pavers

Installing Heat Cable under Pavers (Quick Reference Guide – Article 3 in a Series of 3)

Remember to check the element resistance and the insulation resistance of the heating cable/mat at the recommended intervals:

  1. In the box: Write the values on the warranty card.
  2. After being laid out: Write the values on the warranty card.
  3. After being covered: Write the values on the warranty card.
  4. Record your readings in the installation manual.

When laying out the cable, DO NOT allow heating cables to touch, cross, overlap or get bunched up. Minimum allowable spacing is 2 inches.

Begin installation as close as possible to the electrical source.

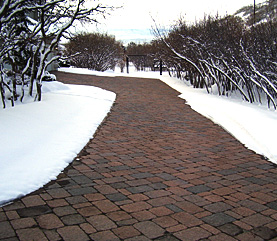
Heated driveway with brick pavers

DO NOT cut or alter the heating cable. The white binding tape of heating mats may be cut in order to make turns with the mats, but the heat cable must never be cut or altered.

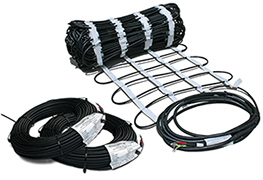
ClearZone heating cable in mat and rolled.

To secure the cable, lay down a piece of thin wire mesh that fits the area to be heated. The wire mesh should be secured to the ground (with landscaping staples or pins) so it will not move during the embedment process.

Roll out the heating cable or mat and secure it to the wire mesh or grid using plastic zip ties. Heating cables should be securely fastened so they do not move or shift during embedment.

Heating cable should be spaced at no less than 2-inches center-to-center and no more than 4-inches center-to-center. This also applies to the cables in adjacent heating mats.

Contact paver or block manufacturer for total sand or dust depth needed for proper paver/block installation.

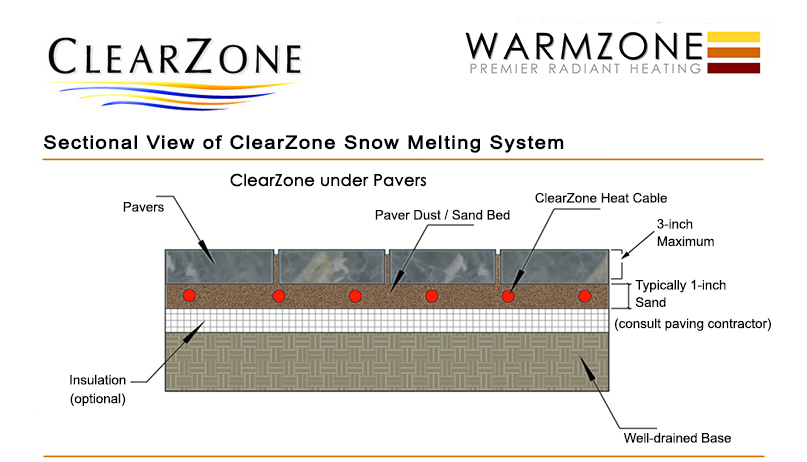
Sideview of heat cable installed under pavers

Embed all of the heating cable and the splice in a minimum of 1-inch (½-inch above and ½-inch below) of compacted material such as paver sand or stone dust. Cable and splice must be completely embedded. No air gaps around the cable or splice are allowable. Gauge of paver sand, stone dust or base material must be fine enough to completely encapsulate cable.

Do NOT drop pavers directly on the cable. (This can damage the cable insulation.)  If this occurs, stop installation and check cable integrity via ohm reading.

Handle heating cables carefully – use extreme care with tools such as shovels, rakes and wheel barrels to avoid damaging the cables.

Verify cable integrity by checking resistance often during installation.

It is important that this equipment be installed by a licensed and qualified electrician and in accordance with local laws, codes, regulation and in accordance with NEC guidelines.

If installing in permeable pavers or with pavers or blocks greater than 3-inches thick, contact Warmzone BEFORE installing.

* This list is intended as a general quick reference guide. It is NOT a substitution for proper training and following the installation manual. Always read and follow the installation manual. Web-based training is available on request.

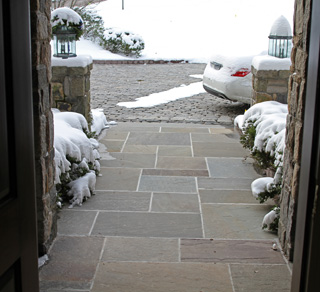
Heated paver walkway

For more information about installing heated driveways and paver snowmelt systems, visit Warmzone’s Installation Overviews web page. Warmzone also provides a host of radiant heat installation videos online as well. Call us today for more information at 888.488.9276.

Hydronic or Electric Radiant Heat?

Choosing the Best Radiant Heating System for Your Needs

Radiant heat systems are a great way to make your life at home or work safer, more comfortable, and simpler. They can be installed under a wide variety of interior surfaces, as well as exterior applications such as walkways, stairs, ramps, and driveways. When considering radiant heat, making the decision between an electric system or a hydronic system can often be daunting. Both types of heating systems have advantages, but it is important to have all the information you need before deciding which is best for your home or business.

Hydronic Radiant Heat

A hydronic radiant heat system is complex and requires many different components. Hydronic floor heating systems work by heating specially treated water and pumping it through flexible PEX tubing embedded under the surface. These systems use a gas or oil burning water heater (boiler) to heat the water, which is then circulated through the manifold and tubing by electric pumps. At Warmzone, only the most efficient condensing boilers and industry leading components are used when installing a hydronic system. Because of the various components and complexity of hydronic systems, the installation costs tend to be notably higher than those of electric systems.

Hydronic snow melting systems also utilize the combination of water and propylene glycol (anti freeze) that is heated and circulated through a closed loop of PEX tubing. In addition to the liquid retaining heat for a time after the system has been shut down, the condensing boiler can be run by almost any energy source. As a result, hydronic systems may boast lower operating costs than those of similarly sized electric systems. This makes hydronic systems a popular choice for large installations.

Fully automated hydronic snow melting systems from Warmzone are controlled by premier components, including an aerial- or pavement-mount snow sensor. These sensors detect precipitation and temperature to activate and shutoff the system as needed.

Electric Radiant Heat

One of the most popular forms of radiant heat used today is electric. An electric radiant heat system works by using a thin resistance electric heating cable that is embedded in the medium, or directly under the flooring. Electric radiant heating can be installed to warm almost any type of flooring in your home; and can even be added to heat existing floors if the floor joists are accessible.

Warmzone floor heating systems are energy efficient and exact, as each separate flooring area/room can be controlled by an individual thermostat. The other advantages of electric radiant heat include easier customization and a more rapid response time when compared to hydronic radiant heat. An electric radiant heating system is much easier to install than a hydronic system, and is commonly used for interior heating applications as well as heated driveways and outdoor applications, including roof deicing.

Heated paver driveway

An electric snow melting system heating a paver driveway.

Electric systems may have an advantage in the outdoors, as they heat rapidly and can more easily prevent buildup of snow or ice. The Clearzone snow melting system is one of the premier driveway heating systems available. It uses a special line voltage cable that produces 35-50 watts per square foot, and is ruggedly designed and constructed to withstand concrete pours and high heat from asphalt installations. Just like the hydronic system, the electric system uses an aerial or an in-ground snow sensor to engage and disengage the system. This system also has no moving parts, so it requires little to no maintenance, and does not require a dedicated space for mechanical components like that of a hydronic system. Electric heat can be a great cost-effective option for driveways. (Refer to our heated driveways web page for general information regarding Calculating a Heated Driveway’s Operating Cost.)

A radiant heating system is a great long-term investment that can increase the resale value of your home and make your business safer and more efficient in harsh winter weather. If you still have questions about radiant heating systems please visit Warmzone.com, or contact a friendly Warmzone professional at 888.488.9276.

Researching Radiant Heat and Finding the Right Provider

The Services and Resources to Look for When Considering the Installation of Radiant Heat

From the initial idea of adding radiant heat to your new or existing home to the actual purchase and installation can be somewhat intimidating for homeowners. Where do you start? What should you be looking for, and what are the options?

Judging from past customers, radiant heat is a proven, worthwhile investment that provides very efficient and luxurious warmth using clean renewable energy. Radiant heated floors continue to gain popularity because of their efficiency as well as the rich, comfortable heat that they produce.

Find a provider that includes complete system design services and a large selection of products and services – from different manufacturers. Warmzone is one provider that offers a dynamic range of radiant floor heating systems. Because of the diverse selection, Warmzone can evaluate your specific needs and recommend the system that will best meet your budget and heating demands. So, if you’re considering installing a heated floor, view Warmzone’s Floor Heating Overview web page to gain some general information about the different systems. Then call a Warmzone representative to discuss the various possibilities and the advantages of each system (888.488.9276). Our staff features experienced professionals who are happy to consult with prospective customers without any pushy sales pressure.

Heated driveway and radiant heat installation support

Warmzone includes professional installation support services.

And when it comes to customer service, you won’t find a provider that offers better customer services. Warmzone services include FREE installation training for installers, detailed system design and layout services, technical support, free consulting, and a wealth of online documentation, videos and information resources. We take pride in our unparalleled personal services as well as our industry leading products.

Warmzone snow melting systems are also among the very best available. Warmzone continues to be a leader in offering the latest technology with the most trusted and proven systems. Warmzone heated driveways and snow melting systems are easy to customize to match the budget and performance requirements of each customer.

ClearZone heat cable is the longstanding backbone of Warmzone’s exceptional snow melting systems. In addition to the heating element, Warmzone driveway heating systems also feature a contactor panel/controller and either a ground-mount snow sensor or an aerial mount sensor. These advanced activation devices detect precipitation and temperature, so when conditions warrant, the sensor triggers the system and the driveway begins to heat. The system continues to operate for a short time after the storm to ensure that the driveway is dry, eliminating slick, dangerous ice.

Fully automated, energy efficient, and featuring quiet, clean operation, Warmzone snow melting systems continue to be a favorite among contractors and professional installers.

For more information, call us at 888.488.9276 and speak with a radiant heat consultant. Also take advantage of our online information resources and view radiant heat installation videos, monthly newsletters, product literature and more. We think that the more you research and compare radiant heat companies, the more impressed you’ll be with Warmzone. Call or email us today for a free quote.